NEW: Learning electronics? Ask your questions on the new Electronics Questions & Answers site hosted by CircuitLab.
Microcontroller Programming » Connecting multiple buttons on the MCU
|
April 05, 2011 by lnino 
|
Hi at all. I thought about wiring 10 Buttons, 3 LEDs, a servo and so on ... on my MCU. As I tried, I was only able to get those things running on PORTC. The won't work when I put them on PORTB,D although I used the right syntax. For instance: Is there a reason why this won't work or did I forgot something important. If it's really not possible to use this ports for my buttons, how can I realise a selfmade keypad(0-9). Do I need two microcontrollers and how do they communicate with each other? Do I have to wire 0-5 on MCU1 and 6-9 on MCU2? But how do they know which button has been pressed on the other MCU? Are there ports on the atmega168 which I can't use for buttons, leds, servos and so on? And why? Is it possible the get 10 buttons or more running on a atmega168? I am a little confused right now. Maybe somebody can help me out. |
|---|---|
|
April 05, 2011 by bretm 
|
Pin PB1 should work just like you described. What symptoms are you seeing that shows that it's not working? All of the PORTnx pins can be used as general-purpose I/O pins. The bootloader that comes on Nerdkits chips puts PD0 and PD1 into serial-port mode and you have to disable that, and PC6 has to be the RESET pin unless you go through way more trouble than it's worth, and PB6/PB7 are for the crystal, etc., but the other PORTB and PORTD pins should be fair game. So if you're not using the LCD you should be able to easily use PB0,1,2,3,4,5, PC0,1,2,3,4,5, and PD2,3,4,5,6,7, and PD0,1 if you disable the serial port. |
|
April 06, 2011 by lnino
|
Hi bretm, thanks for your reply. There was no error message, it was just not working. I will give it another try, maybe something wasn't wired correctly. Perfect to know which ports I can use. Thanks for that. So for my project I think I will have to remove my display to have enough ports available. Because I want to connect 10 Buttons, 2 Leds, 1 Servo and 1 Piezo Buzzer. For the case I want to connect more items on a MCU which are physically possible, are there solutions? Is it possible to communicate with a second MCU? |
|
April 06, 2011 by Rick_S 
|
You could use something like I am using in the I2C LCD project. I'm using a 16bit I2C port expander which effectively adds 16 I/O lines to the microcontroller. It could be used to handle all your buttons using only 2 lines from the micro (pins 27 & 28) That would leave you plenty of space for your other components. Rick |
|
April 06, 2011 by lnino
|
Hi Rick, thanks for your informational reply. I was trying to find this port expander in Austria and Germany in the webshops, but I had no luck. What I found there was a MCP23016-I/SP. The datasheet is: HERE Can I use this one instead of your MAX7318? And how do I communicate with the ports of the port expander? When I want to wire a button on the expander, do I have to speek with the ports of the new expander directly? Or through pin 27 & 28? Can you give me an code example? And can I expand an expander? Or is this the maximum which I can get? |
|
April 06, 2011 by Ralphxyz 
|
Hi Inino, yup you can use the MCP23016-I/SP. In fact I found a tutorial the other day using that chip for 16 buttons. I'll see if I can find it again. Ralph |
|
April 06, 2011 by lnino
|
Hi Ralph, thanks for the reply. Great that you just were in contact which that controller. I am looking forward to your reply. |
|
April 06, 2011 by Noter 
|
You can also communicate between mcu's using I2C. It's refered to as TWI (Two Wire Interface) of the ATmega but it's the same thing. There are a couple of examples buried in Rick's I2C LCD thread and the latest version of TWI master/slave code is in the Access Serial EEPROM using I2C thread. Between the two you should be able to find everything needed to communicate between two or more mcu's. I prefer using additional mcu's over port expanders because of greater flexability and processing power as well as reduced hardware cost. As your projects get more complex and require more processing power you will run out of cycles on a single mpu regardless of the number of IO pins available. Likewise with flash, all the functionality on a single mcu means a much larger program. Here is my current rats nest - one mpu driving three others via I2C slave master:
|
|
April 06, 2011 by Ralphxyz
|
Here is a Arduino I2C multi button project, which as Paul said in conjunction with Rick's and his code you will have most of what you need sitting in front of you. There also a few Instructables. Including one MIDI board that really looks interesting. I sure like the idea of using multiple mcus now that's cool. Ralph |
|
April 08, 2011 by lnino
|
Thank you guys. |
|
April 17, 2011 by lnino
|
Hi guys. I have now read the posts and some links I found on google, but I have definately no clue how to get my MCP23016 working? Maybe someone has experiences with that chip? Or someone can explain what I have to do? Here are some links which I have found. Thanks for your help. |
|
April 17, 2011 by Ralphxyz
|
What mcu are you planning to use? If you are using a ATmega168 or 328p you "should" be able to use Rick's code to talk between the 168 and the MCP23016 using I2C. Then you just need how to process input. The Arduino samples should get you going you just do not use wire.h. If you have the MCP23016 then try it throw a switch and see what happens using the samples that have been linked to so far. Did you look at the Instructables? That MiDi board should have your answers. Ralph |
|
April 17, 2011 by lnino
|
I think I have to take a second look on the post. :-) |
|
April 21, 2011 by lnino
|
I have now studied the Instructables. Now I know the theory about I2C. In spite of the link postings of Noter and Ralph I was not able to start writing a code for my I/O expansion. I really have a thinking blockade and the arduino stuff is really confusing me. Can someone give me a code example for my project? In my project I have one atmega168 with some buttons, lcd and buttons on it. Because the ports ran out I want to connect a I/O Expander to the atmega168. On this I/O Expander I want to connect a button and a led. (Later more buttons) Maybe someone can help me. Thanks a lot. |
|
April 21, 2011 by Noter
|
I think that Rick's thread on the I2C LCD must be very close to what you need because he also used an I2C port expander. Did you see his source code near the top of the thread? http://www.nerdkits.com/forum/thread/1382/ |
|
April 21, 2011 by Ralphxyz
|
This is Arduino code but you should be able to transpose the Arduino wire.h code to the TWI code used by Rick and Paul. Rick and Paul use different libraries but they both make the native TWI calls. Post your questions on transposing the wire.h it would be good to have that documented on the Nerdkits forum. Ralph |
|
April 23, 2011 by lnino
|
I started another try and was able to get a little bid forward. But now I got stuck during the "make" process. When I type in make on the console it says: "Undefined Reference to 'i2c_int' and all other methods which are part of twimaster.c. I downloaded the zip package from Fleury Link and copied 2 files(i2cmaster.h and twimaster.c) into the folder of my testprogram for the io expansion. So in my folder(io_expander) are now 4 files(i2cmaster.h,io_expander,twimaster.c and makefile). Can someone tell me what I am doing wrong? io_expander.c: Makefile: |
|
April 23, 2011 by Ralphxyz
|
Here is Rick's Makefile from his I2C LCD thread: Notice you do not have any reference to twimaster in your Makefile Such as Line 10 has: He was nice enough to put this together to use with the tempsensor Nerdkit project outputting to the LCD using I2C. So change your makefile and let's see what happens. Ralph |
|
April 23, 2011 by lnino
|
Hi Rick, I have added the line and a second one in the make file. I also had to change the path of the i2cmaster.h in the Fleury Lib. Now I can load my code into the MCU. But nothing happens. My code should display the numbers 0-254 with the help of 8 LEDs in a loop with 1 second delay. Can somebody find an error? |
|
April 23, 2011 by Noter
|
The i2c address is 7 bits but shifted left 1 bit to make room for the read/write bit in the LSB position. So the byte looks like aaa aaaa w, w is 0 for write or 1 for read. So to write to device 0x20, 010 0000 0 or 01000000 or (0x20<<1)|0 or 0x40 in the start_wait routine. I like your test program. I think Ralph may want to use it to debug his i2c port expander problem. |
|
April 23, 2011 by Ralphxyz
|
Inio, post your make file. Like Noter said I am trying to run your code also. What pins do you have the leds on are you using switches for input? Of course I am using the MAX7318 not the Microchip MCP23016 so I'll have to transpose the pins. Are you still using the same code? Ralph |
|
April 24, 2011 by lnino
|
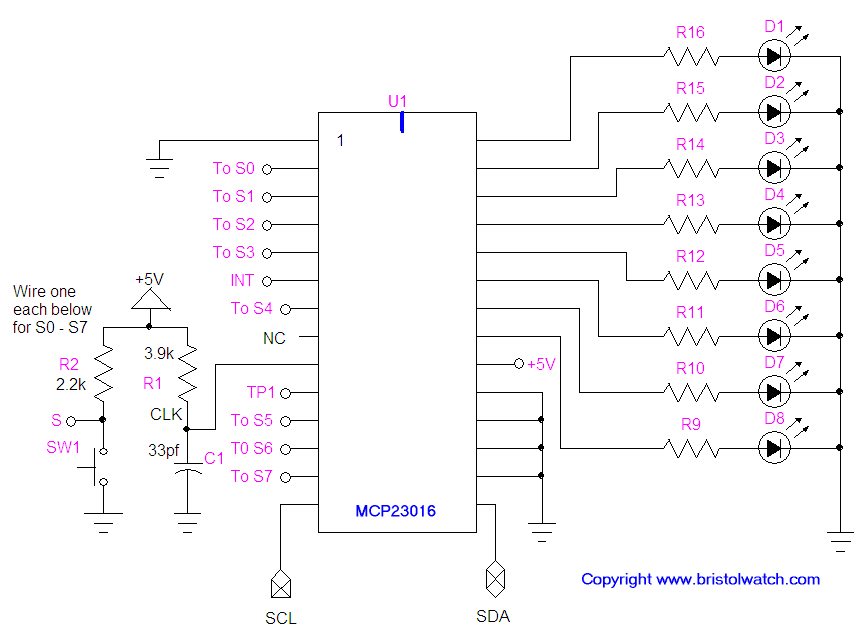
@ Noter: Did I unterstand that right, that I have to use 0x40 when I want to write data and 0x41 when I want to read data? In this case is read like input (button) and write like an output (led)? Is my code correct, or do I have to change the device address? @ Ralph: Of cource I will post my makefile. Makefile of my project: Makefile of libnerdkits: I copied the files i2cmaster.h and twimaster.c in my libnerdkits folder. The code I used for this project I transposed from an arduino post. LINK The code of my io_expander.c is still the same. I haven't changed it since I posted it. The code seams really simple, but I don't know exactly what every line is doing. Maybe somebody can comment my code who understands it? Here is the Datasheet of the MCP23016 Datasheet I found some old leds which I used in my car some years ago. I have bought them with resistors because they have been connected to 12V. Do I also need the resistors in my project? I wanted to be secure. I connected the LEDs to the Pins GP0.0-GP0.7 of my MCP23016. And here is my environment:
|
|
April 24, 2011 by Rick_S
|
Inino, Looking at the Datasheet for the port expander you have, it appears that it's quite software compatable to the Maxim port expander I am using. Here's a couple of observations.
Rick |
|
April 24, 2011 by Rick_S
|
One other thing I just noticed about your wiring, you need to add pullup resistors to the I2C bus. Without them, it will not work. I use 4.7k resistors from SCL to 5v and SDA to 5v. It wouldn't hurt to put a bypass capacitor between the power and ground of your expander. You may be OK without it but it's a good habit to get into. Rick |
|
April 24, 2011 by lnino
|
Thanks for your reply. I have now changed the address of my MCP to 0x40. But there is still no light on my LEDs. But it can be the reason as you said with the pull up resistor. You are completely right with the led and resistor setup. That is completely useless. :-) I will change it. I do not understand why to use the read/write functions of your code. Isn't it the same in the i2cmaster.h? I think I do not understand. Maybe you could help me to understand it. Your function uses the functions of the i2cmaster.h. What is the difference between this function and my code? Or is there more to use than this function? Thanks for your help. |
|
April 24, 2011 by Rick_S
|
Not really any difference, it just allows you to call a function to process the data rather than long-handing the transactions each time. Rick |
|
April 24, 2011 by Noter
|
The datasheet has detailed information on I2C (two wire) as well as everything else on the ATmega*8's. Thumb thru chapter 21 and you'll see definition of the address bits discussed above and lots of other useful information including pull-up resistor values. Download a copy because you will need to reference it often as you implement various features of the chip. There are different documents existing on the ATmega's but here is the one I use: |
|
April 24, 2011 by Ralphxyz
|
I replicated Inio's setup using the MAX7318 port expander. Now where is the address being called or used? I see But DevMCP23016 is never referenced again. I am "trying" to compare to Rick's I2C tempsensor code he put together for me but I can not see where the address is being set in the tempsensor-I2C code either. Also if 0x40 (read) and 0x41 (write) why not just do that in a #define? And then when you want to write just reference deviceRead or deviceWrite? Why bother appending the device address to make up 0x40 or 0x41? Lots of questions but this is great I am actually starting to try to think like a programmer instead of a component assembler. Ralph |
|
April 24, 2011 by Noter
|
Ralph, it doesn't matter that much, it's just a matter of style. As long as it works I would say your style is good. I like to see the address value in its natural state so I would go for the style that shifts the value. I also try to remember to code in a fashion that resembles the documentation. SLA_W and SLA_R are defined/referenced in the datasheet. then Now if the program gets large and I search the program for the address 0x20, I find it although I may find lots of them depending on the program. If I search the program for SLA_W or SLA_R, I find them and very quickly I am looking at the code I want to see. But, it's not critical as long as the code works. Some organizations implement these types of styles into coding standards to keep code structure of all their programs similar thus increasing productivity of their programming staff. |
|
April 24, 2011 by Ralphxyz
|
Wow I am already up to questions of style. Thanks Paul, now, and again it might be style or just plain wrong, you have to consider the source. instead of: why not: Wouldn't the append work? I like the style of SLA_W what does SLA stand for? I know, I know I'll be re-re-re-re-reading the specsheet but thought I'd ask. Ralph |
|
April 24, 2011 by Noter
|
That's not concatenation, it's addition. And your SLA (slave address) must already be shifted left to use that style so if you see I2C_DEV_ADDR somewhere as 0x40 you will have to shift right in your head to know it SLA 0x20. |
|
April 24, 2011 by Ralphxyz
|
What is concatenation then geesch back to the books. Now this is cool I am actually seeing something on the digital analyzer that shows me what is going on, well actually it shows me what isn't going on:
Then more of the session:
So the Slave is not sending back a Acknowledgement. Most likely because I still do not have the correct address somewhere! I modified: What should I have changed if not i2c_start_wait()? Ralph |
|
April 24, 2011 by lnino
|
Hi guys. I see the thread moved on a lot. I was now able to change my project(resistors correct wired to the leds and resistors as pull up resistors). I used 10K resistors as pull up resistor because I only had 3.3K and 10K. I wired the short end of the led to the resistor and the resistor is wired to GND. The long end of the Led is wired with a pin of the port expander. I also put in a CLK and a capacitor. Is the technical part okay? After I had uploaded to code into the MCU, nothing happened. I changed to address of my port expander to x40. What else do I have to do? Maybe can I simplify my test project. Maybe it would be easier to turn on only one led by a button press? How can I realise that? Or did I something wrong with my libs. Here is what I did with my lib: 1) Download of the zip file of Fleury. 2) Copied the files i2cmaster.h and twimaster.c into my libnerdkits folder. 3) Modified the makefile of the libnerdkits folder. I inserted the following lines: 4) I executed the make command and then I got the twimaster.o 5) And at last I changed the path in the file twimaster.c of the includefile "i2cmaster.h" to "../libnerdkits/i2cmaster.h". io_expander.c: Here is a image of my current project.
|
|
April 24, 2011 by Ralphxyz
|
Hi lnino, as I said above I have replicated your project using the MAC7318 port expander. I changed your code the same as you did. As you can see from the digital analyzer images above the address is still not correct. There has to be somewhere else that needs to be changed or the syntax is not correct. Why do you have a crystal on the port expander? Or is that not your port expander. If not what is it? It looks like it might be a microprocessor is it a PIC? Ralph |
|
April 24, 2011 by lnino
|
This is my MCP23016. In the datasheet I saw a CLK and I thought I can put a crystal and a capacitor on it. Should I better remove them? |
|
April 24, 2011 by Noter
|
Ralph, what address in shown on the analyzer for your SLA_W? Looks like 0x10 to me. There is no 0x10 device out there to pull SDA low for an ack so it's a nak by default. lnino, you need to read more in your datasheet, read it all. It says a resistor and capacitor need be connected to the clk input. |
|
April 24, 2011 by Ralphxyz
|
Yes Paul in 7bit mode it's 0x10 in 8bit mode it's 0x20. I think I made the same changes as Inio: That's why I was asking where the address needs to be changed at. does not make any difference between Both are seen as 0x20 at the Start. Ralph |
|
April 24, 2011 by lnino
|
@ Noter: Thanks. I think I have to read it more intensive. @ Ralph: I am looking forward that we are both getting our code running. I have good feeling. I will test some things on my code and when I was lucky I will post my code. |
|
April 24, 2011 by Noter
|
You changed the program, it must make a difference. If you don't see the a change on the analyzer then your compile, link, or upload must be failing and you are running the same old code over and over on the MCU. Make sure you have no error messages from any of the steps when you build the new version. I see you have the 0x40 in both places in the program and that is correct so the new version must not be making it to the chip for some reason. You could change it to something totally different like 0x7E in both places just to see what you get on the analyzer. If the program is getting compiled and loaded at least you should see something different. |
|
April 24, 2011 by Rick_S
|
Noter, I was just about to pop in and say the exact same thing... You beet me to it! Rick |
|
April 24, 2011 by lnino
|
I searched around the I-net and found some posts. As I see the wiring is a little bid different. They used a capacitor and a resistor on the CLK. And here is a schematic I have found.
|
|
April 24, 2011 by Ralphxyz
|
Paul where do you see 0x40, I only see 0x20. Is this code correct: I am still getting: Ralph |
|
April 24, 2011 by Ralphxyz
|
to answer my own question: SLA as in "Slave Address" though it is never explicitly stated it is just sorta implied. Ralph |
|
April 24, 2011 by Noter
|
I saw 0x40 being passed in the code you posted previously (about 2 1/2 hours ago). Now you are using the 0x20 address and shifting it. 0x20<<1 = 0x40 so you are still calling i2c_start_wait with the correct value. There is something wierd going on with your analyzer. Above in this thread it says "Writing to slave 0x20" and the byte is 00100000 but in Rick's LCD thread your analyzer pic says "W>>0x20" but with the byte 01000000 displayed. I don't know what is up with that. But no matter what it says, it shows 00100000 on your analyzer now and that is a byte of 0x20 meaning SLA of 0x10. I don't think your changed code is loaded on the chip. Did you try changing from address of 0x20 to 0xFF and see if it makes a difference on the analyzer display? Are you for sure seeing the active signal on the analyzer and not viewing a saved buffer? |
|
April 24, 2011 by Ralphxyz
|
Darn the .hex and .o were not changing even with changes to the program. I got new .hex and .o files and now all I get is a flat line on the digital analyzer. I changed i2c_start_wait() to i2c_start_wait(0xFF); I'll try to flip it back. Ralph |
|
April 24, 2011 by Ralphxyz
|
Well when I flipped it back to i2c_start_wait(0x40); I get 7 of the LEDs on bright!! I am still getting a flat line high on SCL and SDA on the analyzer. I guess this is progress :-) Ralph |
|
April 24, 2011 by Ralphxyz
|
Now this is more like it:
Now to figure out why only 7 of 8 LEDs are lit and why they are on constantly it looks like they are supposed to cycle every second. lnino what is your code suppose d to do? Here is the code and Makefile that at least lights the LEDs (7 of 8). lnino, I would start over from scratch with your code. Use the original Nerdkit libnerdkit and do not make any changes to twimaster.c: I am using a ATmega328P so the code has to be modified for the ATmega168: And the Makefile: I was making changes to the code but the .hex and .o files were not being updated so I had to remove them from the root folder in order to get the changes to take. Ralph |
|
April 25, 2011 by lnino
|
Hi Ralph. Thanks for your post. As I see your working code is exactly as mine. You only have much more includes. I think I will start the project from the beginning. How did you use you i2c libs from Fleury? Where have you copied your files? Can you post or upload your i2c libs you have used for your project? Are maybe your complete project, so I can download and start it? So I can copy them into my libnerdkits folder and have the situation as you. How looks your wiring at the current state? Can you post a foto of it? Thanks a lot. |
|
April 25, 2011 by lnino
|
I forgot to ask how you implemented your libs from Fleury in your central makefile of the libnerdkits folder? Can you post this makefile? Can you tell me step by step what you have done after you downloaded the zip file from Fleury. Maybe I did something wrong during the procedure. Thanks |
|
April 25, 2011 by Ralphxyz
|
Hi Inino, first thing the reason the 8th LED did not light is/was because of a bad solder joint on the MAX7318 TSSOP-24 breakout board. The breakout board I used uses gull wing SMT headers, not through hole headers, plus I used low profile Swiss machined pin headers so I had to bend the rather fragile top pins 90˚ and some broke off before soldering them. Excuses excuses I know I should have rung out the breakout board before using it (I "thought" I had). Anyway here are some shots:
I do not have a clean code package as I started using I2C three months ago when Rick (bless his heart) published his WII Nunchuck code. And then DS3232 I2C Real Time Clock code. And then Noter's I2C EEPROM code. And then Rick's I2C LCD code which I could not get to work and then you started this thread with your real simple I2C port expander code so here we are. The includes were from Rick's I2C LCD project code. I have an io_expander folder under the Code folder (Nerdkits/Code/io_expander). io_expander has: My IDE likes to use .h files so there is just a I have libnerdkits under the Code folder (Nerdkits/Code/libnerdkits) I had problems with io_expander.o and io_expander.hex NOT being updated when I changed the device address: I had to delete them both manually before the address change took. Look at the timestamp on your .o and .hex files to make sure they are being updated. You do not need to modify the libnerdkits Makefile or change the path in twimaster.c Now I'll modify your code to test the other 8 output pins and then see if I can get a switched input to fire a interrupt. I need to test all of the pins on the port expander to see if there are other soldering problems and that is why I could not get Rick's I2C LCD code to work. It will not surprise me to find more soldering errors. Thanks so much for starting this thread it has really helped me understand better what is going on with I2C and certainly taught me a lesson in I2C device addressing :-) Ralph |
|
April 25, 2011 by lnino
|
Hi Ralph, great to hear that you had success with your project. I started now with my project at the beginning. And there are again starting problems. In the folder "Nerdkits\Sample Source Code\io_expander" i have following files: My includes of the file io_expander.c are looking like the following: The makefile of my project looks like this: The zip file of Fleury consists following files: Then I copied two files (i2cmaster.h and twimaster.c) into the folder "Nerdkits\Sample Source Code\libnerdkits". I downloaded the libnerdkits folder untouched from the nerdkits website again, so there is no modification. When use the make command I get an error message: An additional question: How do I get the twimaster.o? Do I get it with the makefile of my project? Normally when I write my own lib I make a test.c and a test.h file and I customize the makefile of the libnerdkits folder. When I start after that the make command of in my libnerdkits the test.o is generated. Is this a wrong way? Can you tell me what I do wrong? Or can you give me your libs which are necessary for this project? This is making me crazy. :-) |
|
April 25, 2011 by Noter
|
The error is from twimaster.c. It is looking for i2cmaster.h in the avr lib directory. I would change the following in twimaster.c - to so it will look in it's own directory instead of the avr lib directory. |
|
April 25, 2011 by lnino
|
Hi Noter. Thanks for you reply. Now the make command works. The last time i changed the value to ../libnerdkits/i2cmaster.h -- I think this might have been the same. But my leds are still not lighing up. My code is completely the same as the code of Ralph. Maybe there is a wiring problem after all? I have added a resistor and a capacitor like I saw in some tutorials which I posted some posts before. I also removed the new parts, but there was also no light. Any ideas?
|
|
April 25, 2011 by Noter
|
Using ../libnerdkits means to go up one level (../) to the parent directory and then down into the libnerdkits directory. Since twimaster.c is already in the libnerdkits directory there is no need to go up and back down to the same place so you can leave it out in this case. I'd like to see where that blue wire goes to your nerdkit mcu. Also, what value of resistor and capacitor did you put on the CLK pin? And, what values of resistors are you using for pull-ups on the I2C lines? |
|
April 25, 2011 by lnino
|
Maybe I found a mistake on my wiring. It is recommended in the datasheet to use a 33pF capacitor and a 3.9K resistor and the CLK. Because I do not have values I used other values(0,1microF and 3.3k) instead. Maybe because of that the clock is not working right? I have also find some tutorials and howtos for the pull up resistor on the MCP23016. I found values between 1.8K and 10K. In this project I used a 10K resistor for the pull up. |
|
April 25, 2011 by Noter
|
A .1uf is 100000pf so that probably isn't so good for the MCP23016 clock. My guess is that would keep things from working. Better get some pf caps. Most examples use a 4.7k ohm resistor for the I2C pullup. I have used 2.2k with more slaves and an analyzer connected but a 4.7k is best for your setup. Then be sure SDA and SCL are going to the correct pins on the MCU. That's all I can think of for now. |
|
April 26, 2011 by lnino
|
Thanks for your post Noter. I gonna buy some right stuff and will give it then another try. Thanks to all for helping me on my project. |
|
April 26, 2011 by Ralphxyz
|
lnino, try signing up at Mouser.com for their sample program they will send you samples like the Max7318 free. They probable have a distribution center in Germany. Ralph |
|
April 26, 2011 by lnino
|
Hi Ralph. This is a good information. I am now signed in. How do I get to the sample program of the site? |
|
April 27, 2011 by Rick_S
|
Inino, I'll jump in here. I think Ralph meant maxim-ic.com. You can also get samples from TI, Analog Devices, MicroChip, and I'm sure others. I've personally gotten many samples from maxim-ic, a few from Analog Devices, and am attempting some from Microchip right now.. (just waiting approval of an order). Maxim's sample policy is very hobbyist friendly. Rick |
|
May 28, 2011 by lnino
|
Hi at all. After some time where I had no time for working on my MCU I am back right now. In the meanwhile I bought a lot of stuff for my project(including the resistors and capacitors which I need for the port expander). I changed now the resistors on the MCP3016 to 3.9K and the capacitor to 33pF. I have also changed the value of the pull up resistors to 4.7k. And what a result: "It worked!". Awesome. Really big thanks to Ralph, Rick and Noter all other people who helped me on this project. I have now changed my code to have a button pressed on my MCU which should turn on a led on my port expander. That works great either. Now I was thinking about to try it the other way round. Pressing a button which hangs on my port expander which should turn on a led on my MCU. But I have no clue how to change my code for doing this. Any ideas? I have also a little phenomenon when I use my code counting from 0 to 255. My code hang after some time. When I start my program the leds are flashing and counting nice. But after some time it stops. Always on a different position. And the second thing which I found out is: When I have my batterie connected and I push my button for lighting all LEDs on the port expander they light bright. When I disconnect the batterie the are still lighting but not so bright. When I disconnect the red wire between the two breadboards the light goes off. Why this happens? Is this because of the capacitors which store the current? Or wrong capacitors? Link to the MCP3016 Datasheet -> Datasheet io_expander.c:
|
|
May 28, 2011 by lnino
|
Datasheet of Leds is here Link |
|
May 28, 2011 by Ralphxyz
|
Inino said: [quote] "When I disconnect the batterie the are still lighting but not so bright. When I disconnect the red wire between the two breadboards the light goes off." [/quote] Inino, you should not have the battery connected plus the USB red wire to the + rail connected at the same time. Do an either one or the other but not both. The battery life will not be long using a battery so it might be better to use the USB power or a wall wart. Also I get enough voltage from the yellow USB wire to light leds directly off the mcu I do not know if they would light across the port expander. I never got to using a switch on the Port Expander so I hope you get it working I think some of the links quoted above have some button code. Ralph |
|
May 29, 2011 by lnino
|
Hi Ralph, thanks for your reply. That was exactly the problem, that I used the batterie AND the + of the USB cable. I will try to find out how I can use the port expander to get an input. Is the resitor value the right one on my new red leds(see my picture above)? I took the one from my bigger green transparent leds. |
|
May 31, 2011 by lnino
|
I tried to traspose the arduino code of this post post to get a button as an input working on my port expander, but I was not able to figure out how code works or what the code should do. Maybe someone can help me to understand? |
|
July 12, 2012 by Ralphxyz
|
Hey Inio, now that you are back from vacation, I have been meaning to ask you if you ever got the Port Expander input working? Thanks to your code and all of the great help on this thread I got the output working but never the input. Of course this is from a year ago but maybe you can find your code for the working input. Of course I am leaning toward using Noter's (whom I really miss) method of using the ports on a slave mcu instead of the port expander. Ralph |
|
July 12, 2012 by lnino
|
Hi Ralph, i am Sorry to say that i was Never able to get the Input Working. But I will try again. I am reaching Project sizes where it would be really helpful to have more Pins. I will keep you up to Date when I Start a New try. Thanks for your Support. |
|
March 28, 2013 by lnino
|
Hi Ralph, I am still working on the project to get the input working on the MCP23016. Here is a maybe functional code I wrote which the help of many forum threads and websites. I put some really good ideas together which I found. I had no time to test it, but maybe the next days. Maybe its useful for you. I also found a code which makes it more readable to send write commands. Because the thread I found was in dutch I translated it into englisch and adapted it to work with the nerdkit and the fleury I2C lib. Hard stuff with google translator. :-) But it worked. I have also put some other code parts I found in the web to this code. So this code is a summary of all good things I found on my search with MCP23016. This code is tested and works great. I hope the examples and explanations might help. The Original Code is here: Dutch Code |
|
March 28, 2013 by Ralphxyz
|
Wow lnino, this is great, not only translated from the Dutch but from Arduino Sketch code also. Ralph |
Please log in to post a reply.
|
Did you know that the sparks present in motors can be dangerous for your microcontroller and other electronics? Learn more...
|


Copyright © 2013 by NerdKits, L.L.C.