Sample NerdKits Microcontroller Projects
Scroll down to see a few sample projects that are based on the NerdKits design. In some cases, additional parts are needed, or the more powerful cousins of our microcontroller are used, but in any case, the same knowledge you'll learn with the NerdKits microcontroller kit will empower you to approach these projects with confidence.
-Rick L.
Crescent City, FL

Layering different simple systems together to perform one complex task is really at the heart of what engineering is all about. In this project, we show how it is possible to utilize different technologies and piece them together to control an inexpensive RC Car, with an iPhone. With the NerdKit serving as the bridge between the computer and the R/C Car, it is as an example of how useful microcontrollers can be when they serve as the glue that makes complex systems work together, and how with an understanding of microcontrollers a neat system like this one is achievable as a Do-It-Yourself weekend project.
(Click the image for a free project video and more details!)

Make Music with a Microcontroller
![]()
Using a piezoelectric buzzer element (included with the USB NerdKit), we can turn voltage into pressure waves, or sound. This project demonstrates code which can play any desired tone, and plays a song while showing each syllable on the LCD screen.
(Click the image for a free project video and more details!)

Morse code is a compact way to transmit letters, particularly over telegraph or radio. This demonstrates a system which can automatically recognize Morse code and turn it back into characters, displayed on the LCD.
(Click the image for a free project video and more details!)

Using the OBD-II (On Board Diagnostics) protocol, we can read live information from a car's computer, as explained by our guest star, Elena T., MIT class of 2011. This uses the port under your steering wheel to receive all kinds of information, and is used by auto mechanics for troubleshooting the "Check Engine" light, and for periodic emissions tests with onboard sensors. For our project, we used a NerdKit to read live data like RPMs, MPH, and engine coolant temperature.
(Click the image for a free project video and more details!)
 controls a chest freezer's compressor after the standard cold control broke.")
Freezer temperature sensor
![]()
Since the 1920s, most refrigerators and freezers have been operated by a "cold control", a mechanical switch which lets the temperature of your food turn the compressor on and off. When this part broke in our freezer, the NerdKit came to the rescue. By adding a relay, a transistor, and a buzzer to the base NerdKit (less than $5 in extra parts), the freezer was back and running again -- this time at 8MHz!
The freezer sported the NerdKits LCD display with realtime temperature output (as sensed by the precision temperature sensor included with the NerdKit), and in the picture shown, you can see the programming header and also the buzzer, which lets the operators know if the ice cream is melting.
In fact, this project is such a good demonstration of many important NerdKit features (using the LCD, reading analog inputs, writing C code for decision-making, etc.) that it's one of the first projects we walk you through (without the freezer and relay, of course).
Traffic light controller
![]()
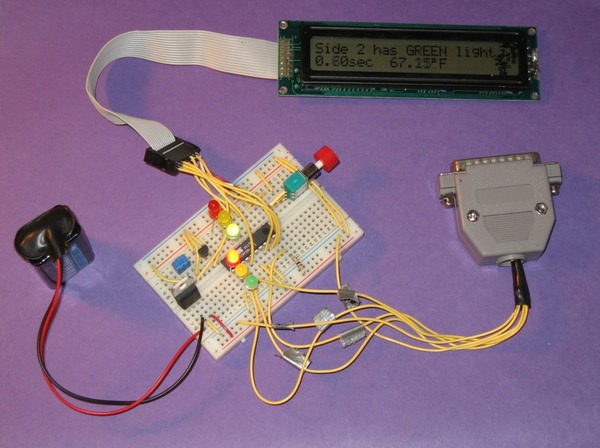
Based on a lab assignment from MIT's Digital Systems Laboratory, this project demonstrates several important concepts critical for using your NerdKit effectively: working with inputs (the button and the concept of "pull-up" resistors), working with outputs (driving LEDs), and implementing a state machine which intelligently makes the system behave according to a set of rules you define. In fact, this project goes well beyond the MIT version, using the LCD panel to display information about the system's state, the timer used to control the lights, and the current temperature.
The scenario is of a two-street intersection, where there are two sets of traffic lights, and also a walk button for pedestrians to get a chance to cross. All of the parts required and shown in the photo are included in the NerdKit!
Hardware random number generator
![]()
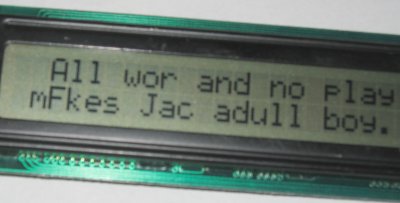
Using only the parts included with the NerdKit, it's possible to make a fairly simple hardware random number generator. Random numbers are particularly important for encryption, like when you use your credit card online, but most computers are only able to simulate randomness. The NerdKit is able to pick up the random voltage wiggles that engineers call noise, and uses this as a source of randomness.
As shown here, the user watches as the NerdKit types out (at realistic typing speeds) the phrase, "All work and no play makes Jack a dull boy." To make things interesting, the random number generator is used to randomly simulate typing errors.
Of course, this is all inspired by this scene from The Shining :-)
Magnetic levitator
![]()
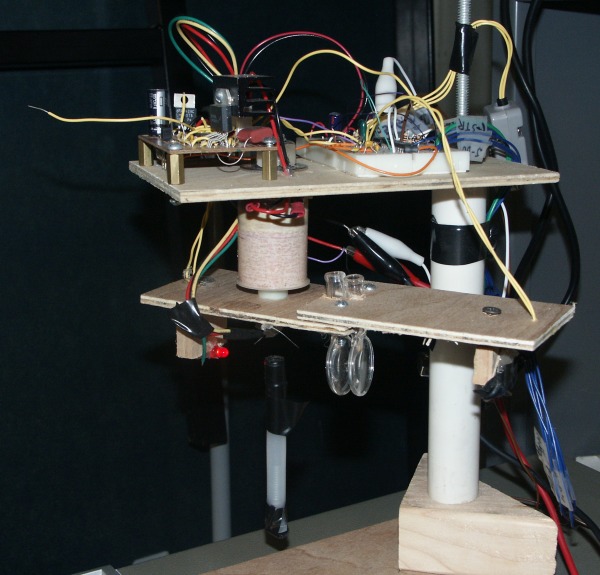
As a final project for MIT's 6.302 Feedback Systems class, students build a magnetic levitator (link to project requirements). This device actively suspends a magnet (and anything attached to it, like the plastic tube shown here) by using an electromagnet and a height sensor in a feedback loop. When the object is too low, the electromagnet pulls up harder to bring it back to the desired position. This is not an easy problem, and essentially it requires building something that engineers call a "lead compensator" to stabilize the floating mass.
While all MIT students are expected to complete the design with analog circuitry, a NerdKit was used for the first ever digital implementation of the 6.302 project. As you can see from the photo, the path between a red LED and an optical sensor is broken by the levitating object. The NerdKit measures the amount of light going through in order to estimate the height of the object, and then implements the controls digitally, determining how much current to send through the electromagnet (and thus how hard to pull on the object). This entire process is repeated several thousand times per second. (In fact, the actual system shown here is a bit more advanced, as the LED is turned on and off so that the effect of ambient light can be cancelled out.)
This required the base NerdKit plus the parts given to each 6.302 project, which includes a prewound electromagnet. The NerdKit serves as the brains of the whole controller. (We're considering making a kit for the magnetic levitator. If this interests you, let us know!)
Spark generator (ignition coil driver)
![]()
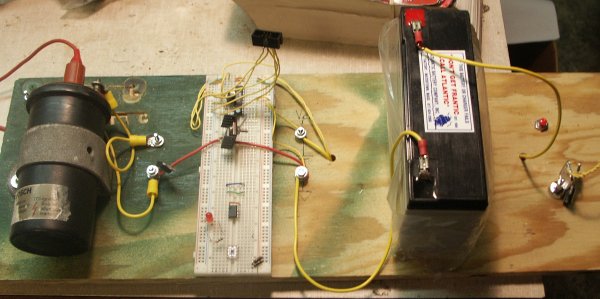
Lots of people like sparks, and big electrical discharges can be useful in some circumstances. In particular, when some students were building combustion-based potato cannons, they found that it was hard to light the hairspray mix consistently with a pizeoelectric sparker from a propane barbecue grill.
Instead, by using a car's ignition coil that was found for sale used on eBay, the sparking could be done electronically. The NerdKit controls the current pulse to the ignition coil, which creates a high-voltage spark which can jump several millimeters in air (see photo). Ultimately, the output voltage even with a 6V battery was over 10kV!
Beyond the base NerdKit, a few extra components are needed: an ignition coil, a high-power MOSFET transistor, and a beefy battery (like the sealed lead-acid one shown in the photo).
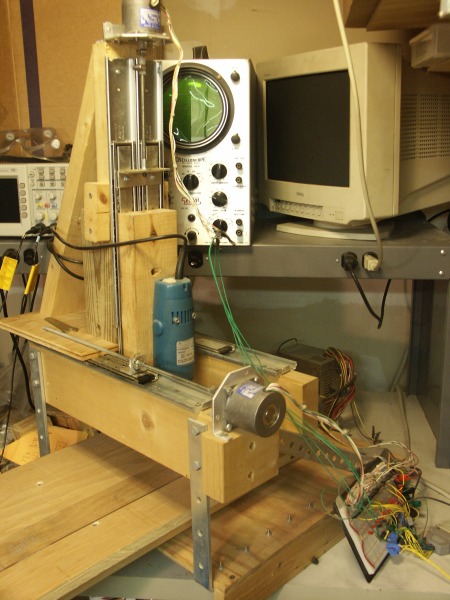
Computer-controlled CNC milling machine
![]()
This project demonstrates an older version of the NerdKit processor, this one a large (and now obsolete) AT90S8535, being used to control a three-axis milling machine. The microcontroller directly controls four MOSFET transistors for each of the three motors, and this precisely moves a cutting tool in relation to the axes. The model shown has 4000 steps per inch in any direction, and was built using cheap parts (like drawer slides) to keep cost down.
While still a work in progress, this project demonstrates powerful abilities of the microcontroller, and should lead to a cool, inexpensive engraving and milling tool.
Videos and More Ideas
You can see more projects to do with your kit in our videos section!
There are also a few web sites that demonstrate the kinds of projects possible with microcontrollers, and hopefully they'll inspire your next design:
Submit your projects!
Let us know about microcontroller based projects you've done with your NerdKit. We like photos!
E-mail us at  .
.
|
Did you know that you can connect a computer keyboard to your microcontroller? Learn more...
|


Copyright © 2013 by NerdKits, L.L.C.