NEW: Learning electronics? Ask your questions on the new Electronics Questions & Answers site hosted by CircuitLab.
Support Forum » avrdude: error: buffered memory access not supported
|
September 24, 2010 by metalmutt |
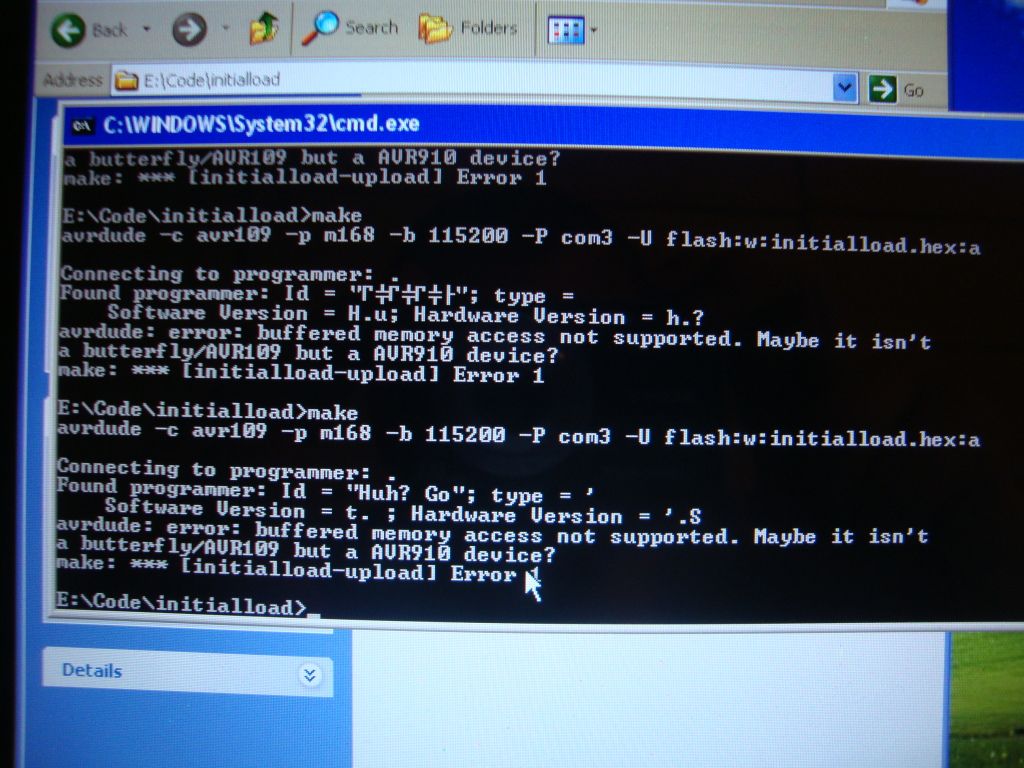
When I try to 'make' the initialload program (on both windows 7 and ubuntu) I get this error http://i.imgur.com/ytnxj.png |
|---|---|
|
September 24, 2010 by metalmutt |
I re-plugged everything and it seems to be working fine now |
|
August 06, 2011 by kirgy 
|
I just had this problem, searched for ages - turns out it was an almost dead battery! Changed it, and now everything is fine. |
|
September 14, 2011 by Sam_Size_12 |
I am having this problem as well. I am running off of USB power any ideas? |
|
September 15, 2011 by missle3944 
|
Hi Sam_Size_12, I'd double check your wiring on your breadboard because sometimes this is the problem. Also make sure you have the driver installed correctly. If you run into some more trouble you can post a picture of your error and we'll try to help. -Dan |
|
September 15, 2011 by missle3944
|
Hi Sam_Size_12, I'd double check your wiring on your breadboard because sometimes this is the problem. Also make sure you have the driver installed correctly. If you run into some more trouble you can post a picture of your error and we'll try to help. -Dan |
|
October 14, 2011 by amorris |
Hello, I am also having the same issue, checked wiring a few times, changed battery... other areas to look? Thanks, APM |
|
October 14, 2011 by amorris |
If it helps... running ubuntu 10.04 (latest avrdude, gcc-avr, and avr-libc), error exactly as metalmutt's image. |
|
October 16, 2011 by amorris |
Nevermind, I got it... replugged the programming header and it is good. |
|
November 26, 2011 by sazD |
Same thing here, puling my hair out, cannot figger this out. Been working on this for "DAYS" |
|
November 29, 2011 by hevans (NerdKits Staff) 
|
Hi sazD, This error can be caused by a whole lot of possible issues. The most likely culprit is either a loose or misplaced wire or a dead or dying battery. If you give us a good close up picture of your setup, and a screenshot of the error you are getting we might be able to help you get you going. Humberto |
|
November 29, 2011 by sazD |
Thanks all, the problem was a com fault, I had my com settings on 9600,7,1,even,xon/xoff. I changed to the right settings and replugged the USB2Ser adapter in & out several times and it finally landed on com7 and bingo, life is good. |
|
December 29, 2011 by eiyenla |
Hi Everyone, I am having similar issue highlighted above and have tried all the suggestions but to no avail. Please any further help will do. Thanks. |
|
December 30, 2011 by missle3944
|
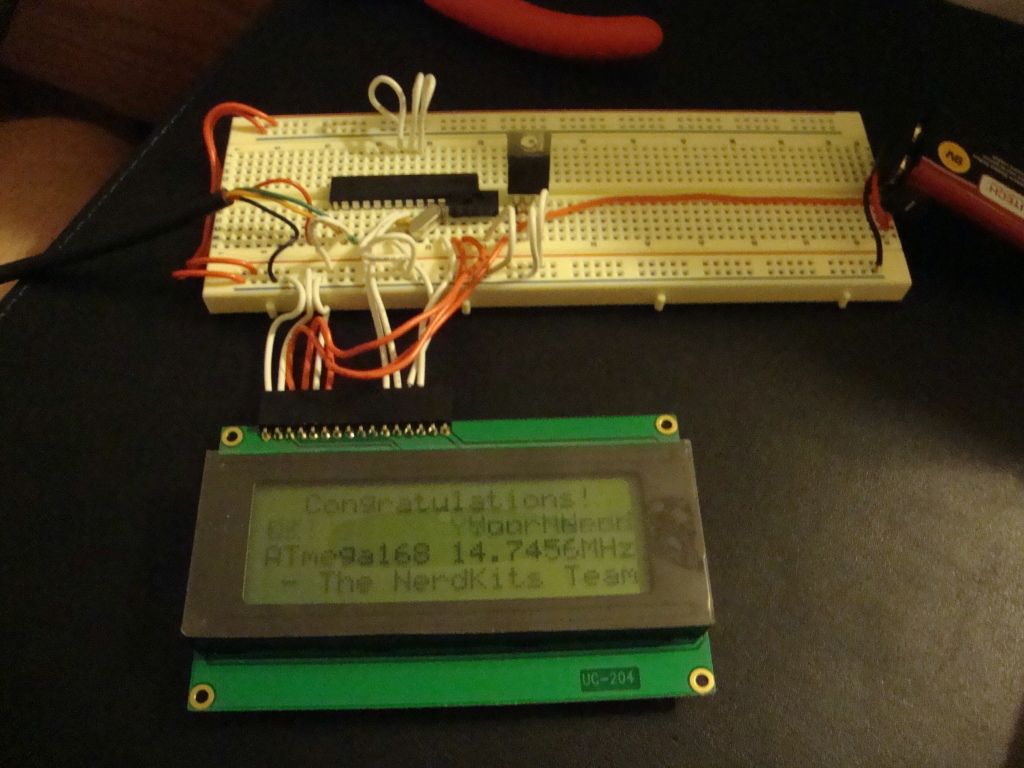
Hi eiyenla, First of all, what OS are you using. Double or triple check your connections to the MCU. Did you get the initialload program to work. Did you get the congratulations text on the LCD? Everyone has this same problem usually, heck, even I did when I got my nerdkit last year. Hope this helps -Dan |
|
December 30, 2011 by Vi3GameHkr 
|
To anyone else that might have this problem: along with double and triple checking all your connections, you might have forgotten to put the prog/run switch to programming mode. To do this you have to disconnect your power source, and plug it back in after moving the switch. Programming mode is where the switch is closer to the ATmega chip. I didn't know you had to disconnect the power source, but I figured it out because when I came back later and plugged it in, the first and third lines of the LCD screen were blank (which I believe means it wasn't receiving data from the ATmega). |
|
December 30, 2011 by Ralphxyz 
|
Which leads once again (at least every three months) to Ricks's great post about using a reset button! Word of warning I used a normal/regular SPST (Single Pole Single Throw) switch not a "momentary" contact switch as Rick suggest and blew my mcu (though I still do not know if that is what caused the blown mcu, but I did end up with a blown mcu (one of many, I might add). Ralph |
|
September 03, 2012 by shakakaan |
|
|
September 03, 2012 by Ralphxyz
|
Ok shakakaan, now what exactly is your question? You might want to start a new thread in a more specific category. Ralph |
|
September 04, 2012 by shakakaan |
Yeah, looking back at it I definitely got a little wordy in my post and kind of made my question unclear. I am getting the same error code that all in this forum have gotten when I try to load the initial makefile. The reference to the settings was just my blind stab at a possible solution. ...also, that being said, would it likely still be in my best interest to start a new thread? I am very new to the nerdkit-and to forums in general-so I would really like to follow proper procedure. Thanks again Rory |
|
September 05, 2012 by Ralphxyz
|
I am the last one to ask about following proper procedure. That said since you have followed everything that has been said in this thread I'd start a new one, you can have a link to this thread in your new thread. So lets start over. Ralph |
|
September 06, 2012 by Rick_S 
|
Hello Shakakaan, Don't know if you are still around or if you are still having the problem but here would be a couple of my observations.
Let us know the results or if you have any questions. Rick |
|
September 06, 2012 by shakakaan |
Rick, Thanks for all the great feedback. I'm still here, I'm just in the middle of so many things I end up spending very little time doing the ones I enjoy. This looks like exactly the advice I need though, I will hopefully get the chance to try this either tonight or tomorrow. Thanks again Rick, you've been so helpful. I will post as soon as I get the chance to try this, and let you know how it goes! Rory |
|
September 06, 2012 by Rick_S
|
No problem, glad to be helpful. |
|
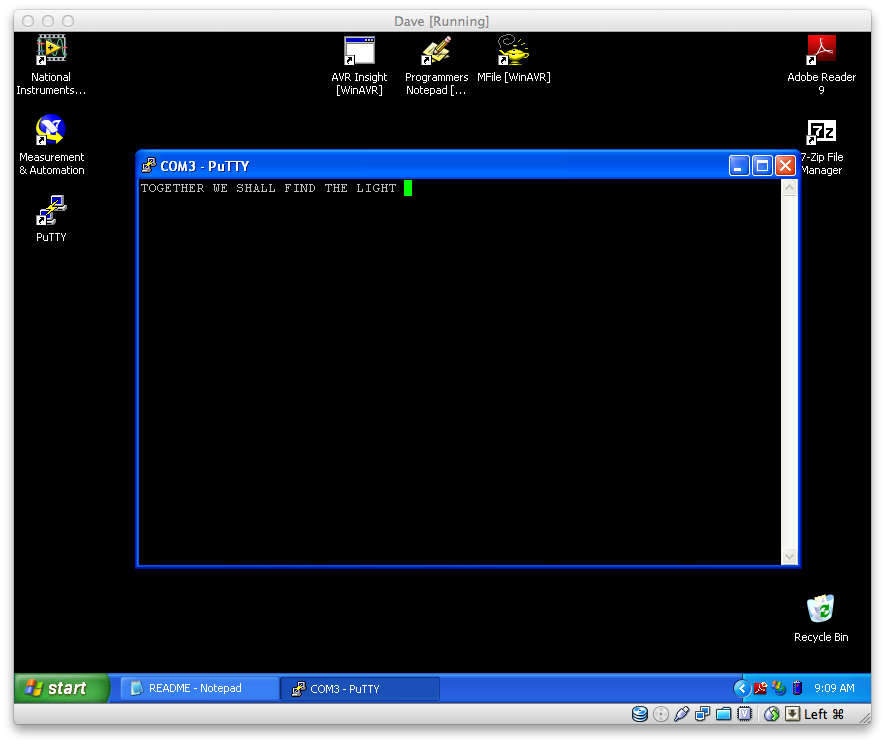
September 06, 2012 by shakakaan |
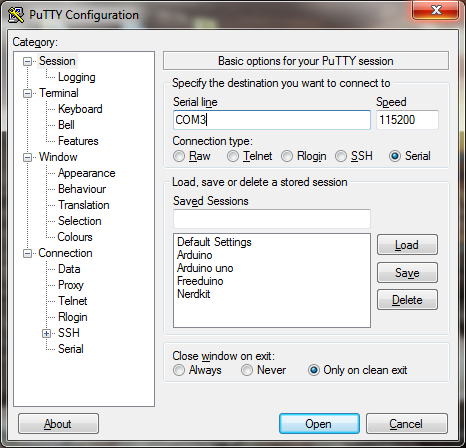
So I installed putty and configured it to the settings you specified,
|
|
September 06, 2012 by Rick_S
|
It should have only worked if the two wires (yellow and green) were in the same row. (Not the same hole, but the same row) There should have been nothing else in that row. You didn't even need to power the Nerdkit. Essentially what you do with a loopback test is connect the transmit and receive wires together so what you send gets echoed back. If they are separated, then there is no echo. If you see the text you type when the wires are not connected then the local echo check box is checked in the serial settings. If that box is checked, you get what you type when they are not connected and get double what you type when they are. What did you get with what wires connected/settings? Rick |
|
September 06, 2012 by shakakaan |
Okay then, I should be in pretty good shape. With yellow and green jumped together, no power to the MCU, and settings as prescribed, my text echoes back on screen. With all the same settings and conditions, but the connection between yellow and green broken, I get no text. |
|
September 07, 2012 by Rick_S
|
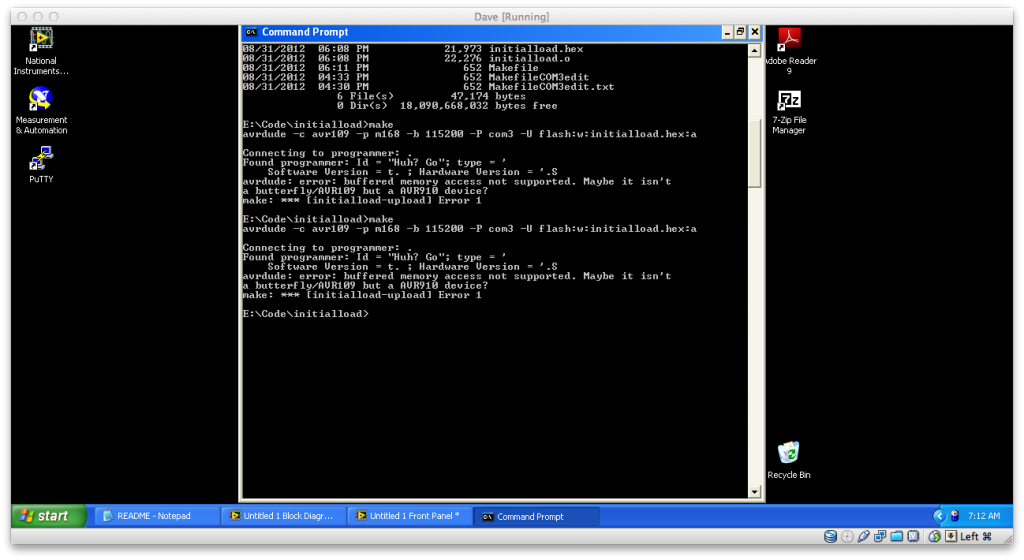
That's good, that means that Com3 is you USB/serial adapter and it is functioning properly. This means that something else is causing your communications to hiccup. Your makefile settings appear good based on your photo above. This pretty much leaves only a few possibilities.
Rick |
|
September 08, 2012 by shakakaan |
...Well I'm feeling a bit hopeless...
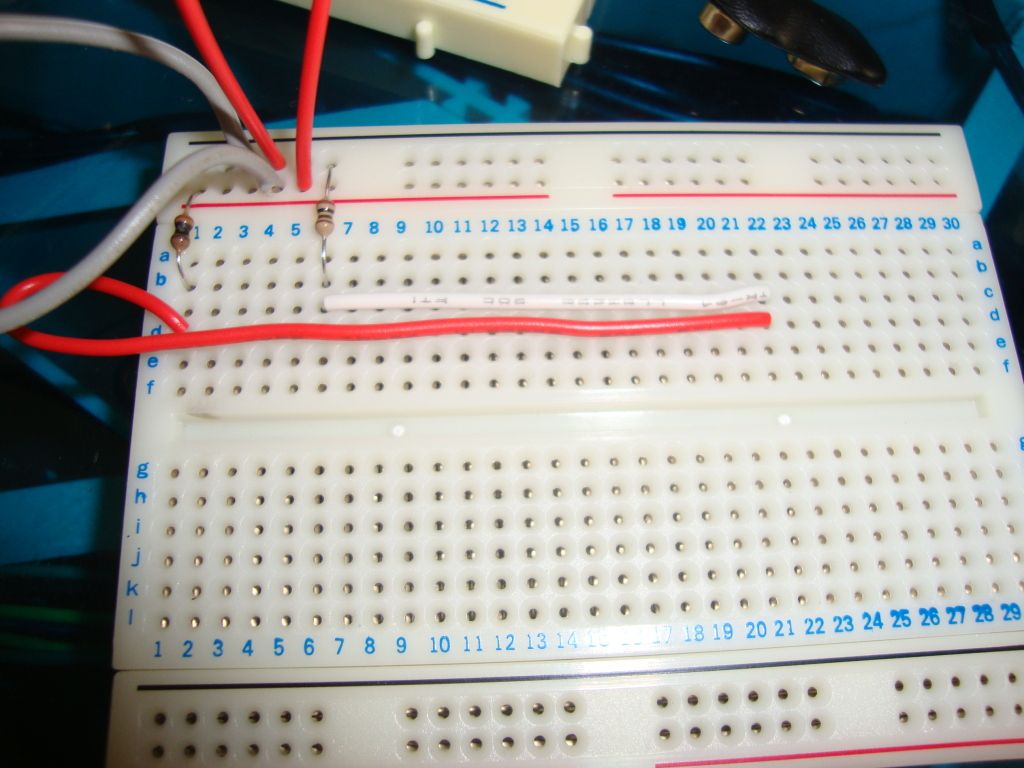
Communication was verified through Putty, I took extreme caution while reconnecting the yellow and green lines to the MCU, and verified all connections once more. To avoid the possibility of a battery issue, I put together a voltage divider circuit to step this 15VDC power supply down to 9VDC. So my power was definitely consistent, and I am pretty confident about my connections.
|
|
September 08, 2012 by Rick_S
|
No, your code couldn't cause this and the line from your makefile looks good from what I can see. (You could post the entire makefile just in case I'm missing something there) This looks more like it is a communications issue between the micro-controller and the computer. We've covered just about all the common problems I can think of. Now we are getting down to the grasping at straws ideas. You could try removing the micro-controller from your breadboard and re-seating it. It's possible a leg got bent over or isn't making proper contact when you placed it in your bigger board. Secondly, you can test to see if your bootloader is talking to your computer. To do this:
This is the acknowledgement that the bootloades is working on the micro-controller. If you don't get that, and you've tried reseating it, the bootloader on your micro may be corrupt. If these don't work, it may be time to contact NerdKit Support to see if they have any other ideas. Rick |
|
September 08, 2012 by Ralphxyz
|
Search the forum for Huh You will see this is a common problem. Ralph |
|
September 08, 2012 by Rick_S
|
Good catch Ralph, I knew I was missing something. |
|
September 08, 2012 by shakakaan |
|
|
October 27, 2012 by Matso |
Hi! I'm getting the avrdude: error: buffered memory access not supported error as well. I got an ATMEGA328P from sparkfun because I lost my ATMEGA168 that came with my kit. I looked through the ATMEGA328P upgrade nano-guide in the member's download section and changed all of the appropriate files as well as added the additional h file io_328p. I also deleted all previous .o and .hex files. I'm just trying to get the chip up and running right now so I'm trying to load the initialload program onto the chip. The command prompt gets though making all of the new .o and .hex files, but it stops for a long time after it prints the line Then about 60 seconds later it prints out Then after about another 10 seconds it prints the buffered memory error. The sheet that came with the microcontroller said it was bootloaded with DUEMILANOVE (the same one that is on the Arduino chips). I've read the previous posts and it seems that most people fixed their problems by triple checking their wire outputs. My question is are there any things that could be going wrong with my set up besides loose wires. Specifically, could the bootloader be incompatible with the code I'm running now and could the fix be as simple as changing a few more files or would I have to find a way to get a different bootloader that is compatible? (I really know nothing about bootloaders). Thanks for the help! |
|
October 28, 2012 by Rick_S
|
The arduino bootloader is not the same as the NerdKit bootloader. You will not be able to program that chip using the standard NerdKit method. To program that you would have to either have it wired per the arduino schematic and use a different USB/Serial adapter, or program it via ISP using an ISP programmer. If all this sounds too much, I'd get another NerdKit microcontroller. Then once you have the circuit working, you could set it up as an ISP programmer as shown in Noter's library entry "Nerdkit ISP Programmer" and once that is setup, you can replace the arduino bootloader with the Nerdkit bootloader by following the instructions in the library for "Installing a Nerdkit Bootloader". After successfully completing all that, your 328 will work as any other Nerdkit bootloaded MCU. Rick |
|
October 28, 2012 by Matso |
Perfect. Thanks for the help Rick. |
|
October 28, 2012 by Rick_S
|
Sorry if that wasn't the answer you were looking for. Another option would be to just purchase an ISP programmer like I listed in the bootloader installation library entry and just use it to re-program the arduino micro to a NK micro. Rick |
|
October 28, 2012 by Matso |
No. Its perfectly fine. I payed 5 bucks for that microcontroller so it really didn't set me back at all. I'm just curious, do you know what makes the arduino USB/serial adapter different from the nerdkits one? I always had the assumption that one USB/serial adapter cable would be the same for everything. Is there some software or something built into the cable that makes it that way? |
|
October 29, 2012 by Rick_S
|
Arduino uses an FTDI USB/Serial controller in their older boards and a programmed microcontroller for the USB/Serial controller on their newer boards. Both ways, they use the DTR signal from these to control the reset function of the micro being programmed so you don't have to flip a programming switch as you do with the Nerdkit mcu. That was why I said you would have to have it wired per the arduino schematic and use a different USB/Serial adapter. Rick |
|
February 22, 2013 by dhjohnf |
Hi,
In reading the above posts I recognized some of the problems I have been encountering and tried testing the bootloader as suggested by Rick. Seems my com3 checked out with the yel and grn wire in same row, but when I re-attached to mcu and tested as described the terminal screen displayed bp, which is different than ba. Wondering if this is a clue to my underlying problem. thanks |
Please log in to post a reply.
|
Did you know that two resistors plus a transistor can be used to make a better voltage supply? Learn more...
|


Copyright © 2013 by NerdKits, L.L.C.
 I have been having the same problem. I had trouble getting everything to work with my MacBook Pro, so I put Windows XP Pro on a virtual machine, hoping that the more commonly familiar OS would give me a better result. I have made a lot of progress from where I was, but now am getting this common error. I can find the Prolific heading in my devices, and I changed the makefile to include COM3. I have double checked my wiring, and have both tested and replaced my battery. The one thing that I could see here that might be a potential fix:
sazD: "Thanks all, the problem was a com fault, I had my com settings on 9600,7,1,even,xon/xoff. I changed to the right settings and replugged the USB2Ser adapter in & out several times and it finally landed on com7 and bingo, life is good."
but I don't know where to begin with these settings.
I have been having the same problem. I had trouble getting everything to work with my MacBook Pro, so I put Windows XP Pro on a virtual machine, hoping that the more commonly familiar OS would give me a better result. I have made a lot of progress from where I was, but now am getting this common error. I can find the Prolific heading in my devices, and I changed the makefile to include COM3. I have double checked my wiring, and have both tested and replaced my battery. The one thing that I could see here that might be a potential fix:
sazD: "Thanks all, the problem was a com fault, I had my com settings on 9600,7,1,even,xon/xoff. I changed to the right settings and replugged the USB2Ser adapter in & out several times and it finally landed on com7 and bingo, life is good."
but I don't know where to begin with these settings.
 typed a random message, and it came back up on the screen. I wasn't sure if I should expect to see this message on the LCD screen, or just the computer, but it only showed up on the computer screen.
Also, I wasn't sure if I should have the yellow and green leads in two separate rows, or together in one isolated row. I tried both, and it didn't seem to make much difference.
typed a random message, and it came back up on the screen. I wasn't sure if I should expect to see this message on the LCD screen, or just the computer, but it only showed up on the computer screen.
Also, I wasn't sure if I should have the yellow and green leads in two separate rows, or together in one isolated row. I tried both, and it didn't seem to make much difference.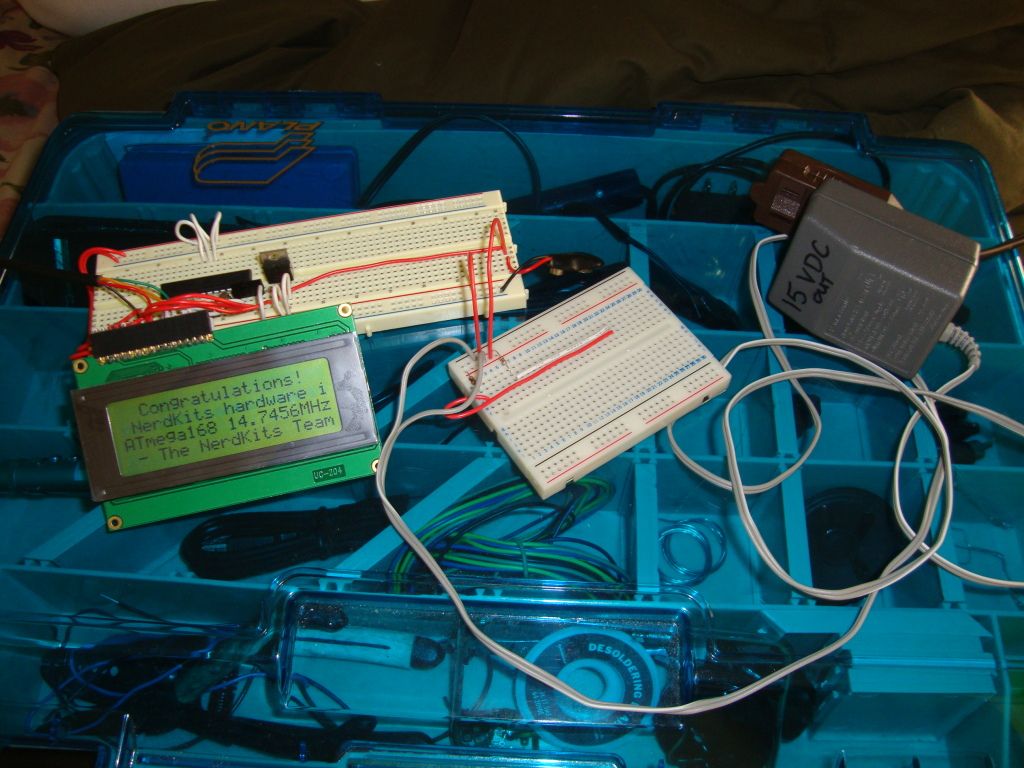
 Any likelihood that I've made some mistake in my end of the codework?

 I had the switch in wrong. So much for my certainty regarding all connections! Anyway, thanks a bunch, everyone has been very helpful. I'm very excited to finally get started with my kit.