NEW: Learning electronics? Ask your questions on the new Electronics Questions & Answers site hosted by CircuitLab.
Microcontroller Programming » Adding a Bootloader to a ATMEGA324P
|
June 05, 2011 by Rick_S 
|
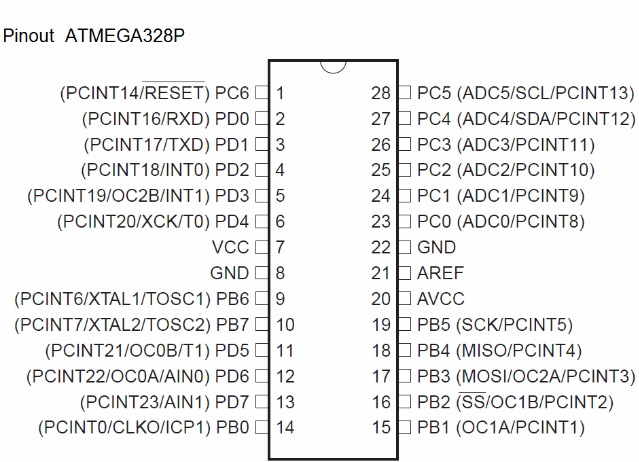
Sometimes I wish for more ports than my microcontroller has. So a while back I purchased an ATMEGA324P microcontroller. This chip is very similar to the 328P in that it has 32K Flash, 1K EEPROM, and 2K Ram, but it has much more I/O available to it. Just compare the pinout. First the 328P which has the same pinout of the 168 we are all familiar with:
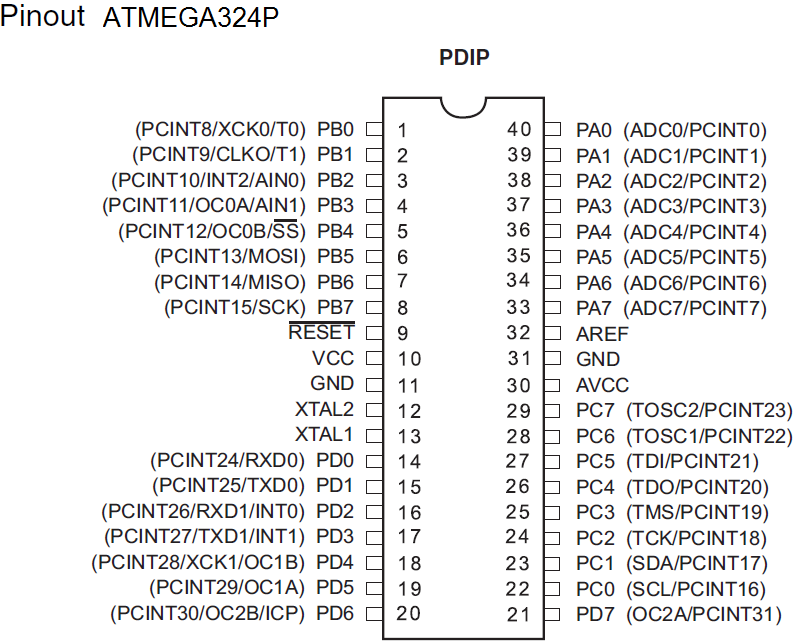
Now the 324P. It's a big 40pin chip... Just look at all that I/O!
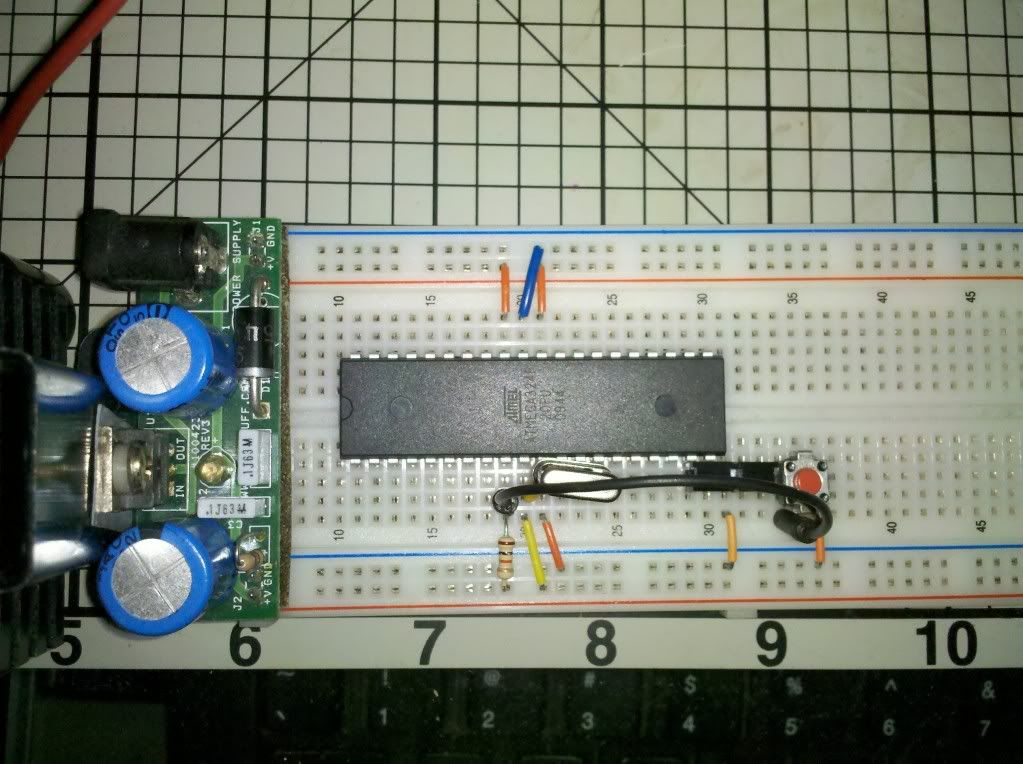
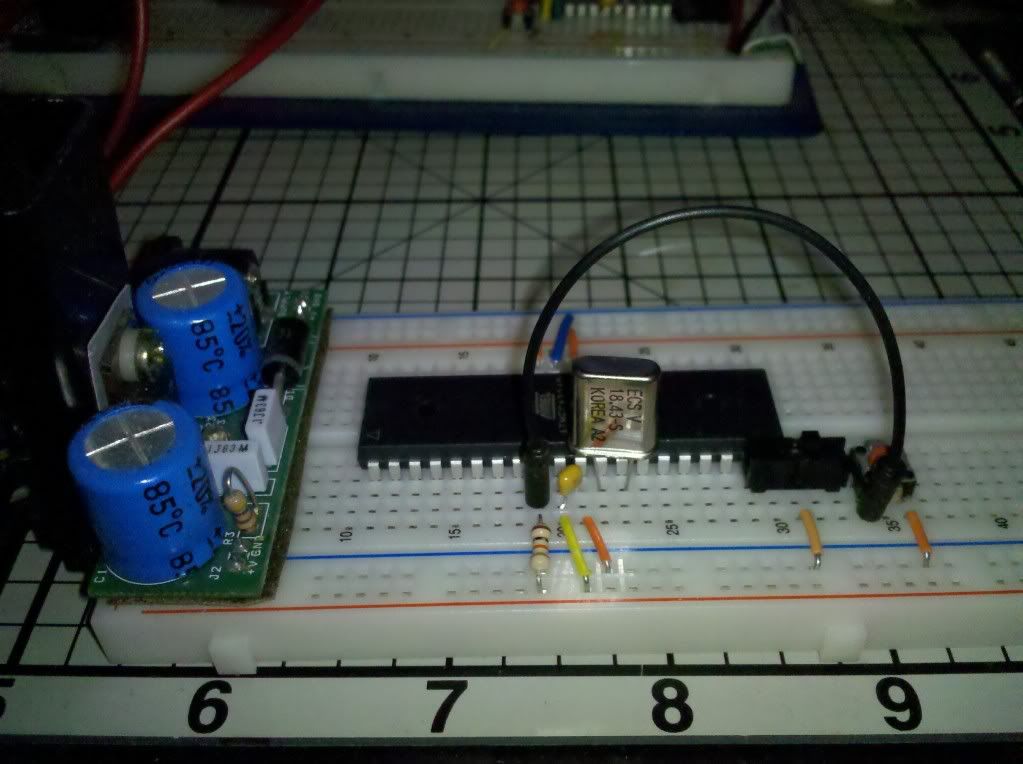
I do like to use the bootloader though and decided now was the time to see If I could modify the bootloader files to support this baby. I'm happy to say I was successful. Below is a list of all the files I modified to make this happen. First I started with the bootloader328p files. I copied them to a new folder called bootloader324p so the originals remained unchanged. I then proceeded to modify files. In avr.mk I added: (This is added in the flags for avrdude section just before the endif) In config.h I added: (This is added in the cpu specific configuration registers section - you'll see several others there) In config.mk I changed: To: This changed the cpu that the bootloader was compiled on to the 324P I opted for a higher speed crystal 18.4320Mhz (the fastest for error free serial coms), and changed the pin to monitor from PB0 to PD6. NOTE: If you do this and intend to use the NK 14.7456Mhz crystal, just leave F_CPU at 14745600. In the NK makefile (the file called Makefile) I changed a fuse setting: For the extended fuse byte I changed it from to: I also changed the programmer and target mcu in the AVRDUDEFLAGS from to: In Makefile.fl, I added a section for the 324p cpu. This was inserted between the 328p and the 32, though I don't think it matters as long as it's in the same section. In uart.h, I changed the elif line for the cpu type to include the 324P like this. From: To: I also added an option for the 18.4320Mhz Crystal by adding this to the UBBR value definistions. I then deleted foodloader.o and foodloader.hex from the folder to guarantee a fresh compile. Then at the command prompt I typed: This compiled the bootloader. I then connected my ISP programmer to the chip and typed: I verified that this was successful. Then typed: Which was also successful. I then connected to the serial port of the MCU and the bootloader worked like any other NK chip. Here is a couple of photo's of the base circuit.
Just thought I'd share... Cheers Rick |
|---|---|
|
June 05, 2011 by Ralphxyz 
|
This is great Rick. I have a Atmega32 that came with my Atmel Dragon programmer that has the exact same pinouts as the ATmega324P. I'm gonna hafta try this. Of course thanks to your I2C LCD project I have more I/O on the 328p and 168 processors. And then you add Noter's I2C Master/Slave projects and I have all sorts of possibilities. I really like the concept of running multiple parallel processors. I'll bet I can directly use your code changes on the Atmega32. I also have some other "big" processors that I will have to take a look at putting the bootloader on. They will requie some further customization I am sure. Speaking of customizations how in the world did you figure out what changes were required? A lot of the changes are pretty logical but some get rather abstract like changing the extended fuse setting. Once again you have read my mind about projects I'd like to someday get around to doing, thank you. Ralph |
|
June 05, 2011 by Rick_S
|
Most of it just came from comparing the related parts on the datasheets between the two. The only thing that took a while to find was the AVR_910 Device code. I found that by looking in the avrdude.conf file. The extended fuse setting is actually the same as for the mega328 except for some reason avrdude reports the unused bits when it reads so even though bits 4 thru 7 are not used they are also not programmed(set at 1) so binary 0x05 (00000101) with bits 4 thru 7 not programmed (11111101) gives you 0xfd instead of 0x05. Same thing only different. I'm not totally sold on the multiple processor thing. I'll admit it is an interesting project and definately has it's applications, but you would have to have a specific need. Just thinking about timing, for a 400Khz I2C bus to send one byte of data to a slave, it has to issue a start condition, then send 8 bits (address), then wait for 1 bit ack from slave, send 8 bit command byte, get ack, send 8bit data, get nack. All total 27 bits sent/recvd just for one data byte to the slave. With a 400Khz clock, that equates to about 60us of time. In that same amount of time, with a 14.7456Mhz clock the cpu could perform around 995 operations. With an 18.432Mhz clock it could perform 1244. Enough operations to do a lot of data output directly on it's port pins with room enough to do other calculations beside. Unless I'm way off on my math... Which I could be... Rick |
|
June 05, 2011 by Noter 
|
The multi-processor thing is quite useful if your processing requirements exceed the capacity of a single mcu which is not hard to do with these little processors. While it works for simple port expansion, that is more a learning exercise than a real application although you have much greater capability and flexibility than with a simple port expander like the MAX7318. The tradeoff for using multiple mcu's is that it will require more work on the software side. If you have plenty of processor for your application and just need more i/o pins, the best way is to use a larger mcu like the 324p. However, chances are that once you start using all those pins you may begin to run a little short on cycles, particularly if you service high frequency time sensitive interrupts. I experienced less than desirable performance running a 7-seg display, a single external interrupt, related calculations, and data display to both the 7-seg and lcd. Either the interrupt was not serviced immediately or the display jittered. Using multiple mcu's took care of the problem. |
|
June 05, 2011 by Rick_S
|
I'll admit that multi-Digit 7 segment displays cost a bunch of overhead especially if you choose to multiplex them. That's where either your idea of the dedicated processor to do the multiplexing or a dedicated driver ic such as a SAA1064 come in handy. The LCD could be sped up some if it was driven parallel and the read was used to find out when it was ready for data instead of just throwing in dead cpu cycles to wait to be sure. I haven't done the read part to do this, but then again, I haven't really had the need. As for processor power, I never continue to be amazed at what I've seen people do with these little guys and I chalk most of my drawbacks simply to my limited programming knowledge. When I see what some have accomplished, there have been full 8 bit color video games created with the help of only a few external components (the main being the AD725 vidoe generator) such as in the uzebox project. I know B/W NTSC video can be easily generated with nothing more than a few external passive components for simple pong/space invaders type games. Video is very timing dependant yet even with buttons being pressed, video is generated. Don't get me wrong, I'm not knocking what you have done, quite the contrary I'm fascinated by a lot of it. I also know there are applications where the extra cpu dedicated to a certain task and just reporting back it's results would be beneficial. I just haven't had to delve into that yet... Maybe someday Rick |
|
June 05, 2011 by Rick_S
|
One other thing, this thread wasn't intended to turn into an extra pins on a cpu vs extra cpu discussion. Both have their benefits and place. Just like the ISP Vs. Bootloader method of programming. I just wanted to share how I went about loading the bootloader onto a different mcu in case someone else wanted to give it a shot. Rick |
|
June 05, 2011 by Noter
|
Oh well, threads do take on a life of their own don't they ... anyway I was trying to interest/motivate you to give the multi-mcu a try. Use Eric's or mine or make your own based on Peter's code for fun. As for the bootloader, I initially went through the changes you have outlined but now I have reworked it so everything is contained in a single c source file and makefile. Sure makes changes easier requiring only simple edits to the makefile to build for a different mcu, clock, baud, or fuse setting. |
|
June 06, 2011 by Rick_S
|
No problem. I may give the multiple mcu thing a shot when the time comes. So far though, I'm having fun just figuring out things like putting the bootloader on a different mcu. I've also been playing around with latching octal buffers to see if I can make a different type of driver for an LED display that would make better use of processor cycles. (Think parallel shift register) My thought with this if it pans out would be to create a display that is 40 x 8 that would fully draw in only 48 - 56 shifts. Still working on the schematic and logic but that was the reason for the bigger chip. It has more than one full 8 bit port that is not tied to the serial or crystal etc... With a single cpu instruction you can write all 8 bits to a port which should save time. If it works out, this will be a hint of things to come... if not... You probably won't hear about it again :D. Rick |
|
September 22, 2011 by kle8309 
|
Rick, I have tried following your steps but for atmega644p but with no luck in the end the make -f makefile.fl compiled |
|
September 22, 2011 by kle8309
|
avr.mk config.mk make.fl config.h fuse and lock settings (set using avr studio 4 GUI) |
|
September 22, 2011 by kle8309
|
uart.h I uploaded the foodloader.hex using avr studio 4 GUI also When I tested with the NK usb-serial cable, it couldn't make connection to the MCU. Could it be the fuse setting? I have triple checked my hardware connections. PD6 is connected to GND when using NK usb programmer. Man, this is so frustrating. Any idea? |
|
September 22, 2011 by Rick_S
|
Kelvin, I'm not quite sure what went wrong. It seems you made appropriate changes for the 644 vs 324. I looked up your fuse settings and bootloader address, they all seem right. I don't have a 644 to try it on. Have you tried using the makefile as I did instead of going through avrstudio? Maybe somehow it's loading the bootloader into an incorrect location?? Rick |
|
September 22, 2011 by kle8309
|
Rick, |
|
September 22, 2011 by kle8309
|
Rick, Did you ever have problem with the PC5..PC2 IO (TDI TD0 TMS TCK) I can pulse High and Low logic for all other Pins except these four. I even tried on a different atmega644p but similar result. Seems like I'm left with 32-4=28 I/O |
|
September 23, 2011 by kle8309
|
After toying around with the fuse setting I found that this is what I wanted: Ex: 0xfd Hi: 0xd4 Lo: 0xf7 Lock: 0xef This will disable JTAG and allow me to use those 4 I/Os And note: must not enable WDTON or else the chip will constantly reset it self!!! To redo the fuse, I had to erase the chip. Take it off the breadboard and put it back on. Upload the foodloader.hex, set the fuses, and lock. Then it is ready to be use. |
|
September 23, 2011 by kle8309
|
I'm looking forward to make the settings for my atmega32 |
|
September 23, 2011 by Rick_S
|
You know, I've kinda put the micro-controllers on the back burner through the summer. Some of my friends from work and I have been playing with RC Planes and I've tried getting into RC helicopters. It's taken a bunch of my time as I'm just beginning. I will probably start to pick the micro's back up as the weather turns and I can't play outside anymore.... Listen to me a 46yr old talking like a kid Anyway, I'm glad you got it working. I'll most likely have to make the fuse setting changes as well. I had noticed the JTAG but didn't read enough to realize it would steal pins for it's use. Thanks for the heads up. Rick |
|
September 23, 2011 by Ralphxyz
|
Kelvin, make sure and let us know when you get the boot loader on the Atmega32. Ralph |
|
September 23, 2011 by kle8309
|
Ralph, I got my atmega32A to work last night (atmega32A is equivalent to atmega32 as far as signatures and dev_code) Oh yeah, by the way, you can find out the exact signature of your mcu by using the avr studio 4 read signature function. Back to topic. Actually, it requires less work to get the Atmega32 bootloader on because the signature and dev_code is already written in the codes. The Atmega32A support usart which means that it can support synchronous or asynchronous. Nevertheless, the PIN configurations are the same for RX and TX so u don't have to worry about it. Just follow Rick's instructions for general guideline. The trickiest part is the fuse setting. I actually messed up one of my atmega32A during the fuse setting (now I can't access it with a regular avrisp so I'm working on the avr Dragon trying to get it fixed). However, on my second attempt, I got the fuse setting to work. If you are using avr studio 4 like me (so much easier to navigate)to set the fuses and lock, make sure to pick the atmega32 chip version in the drop down box. I will post the exact Hi and Lo setting once I get home from school. Maybe I will post pictures too explaining the how avr studio fuse setting work. In summary, I use the cmd to make -f Makefile.fl to get the fooderloader.hex after changing the target to atmega32 (not atmega32A since they are the same*). I use avr studio 4 to upload the fooderloader.hex then I set fuses then I set the lock. After that, you're good. Feel free to ask questions. |
|
September 23, 2011 by Ralphxyz
|
Thanks Kelvin, this is great, course like Rick it'll will probable be in the winter time before I get around to implementing it. I've got a 130' brick path to lay, you know serious stuff not playing around with RC airplanes and helicopters ;-) Ralph |
|
September 23, 2011 by kle8309
|
Here is atmega32A settings: |
|
September 23, 2011 by Rick_S
|
Hey, if you've never flown an RC helicopter before, you have no idea how much "work" it is. Wow a 130' brick path... you have a lot more energy than I do! You know what really stinks. As I play --err "work"-- with my RC stuff, I keep thinking of what I could do if I interfaced a micro with them... Cool blinky lights.. stablility control... the possibilities are endless Rick |
|
September 23, 2011 by kle8309
|
Rick, Have you ever thought of working on a quad-copter? But yeah, MCU is very addictive kinda like alcohol. It all started with the NK haha |
|
September 23, 2011 by Ralphxyz
|
Actually I have been fascinated with RC since I have started with the Nerdkit it just seems as if a micro controller is a natural fit. I really would like to be able to play um or work with a RC Plane or especially a helicopter. I have a neighbor who builds some of the most fascinating RC planes. I definitely have RC on my list of things to do. Ralph |
|
September 23, 2011 by Rick_S
|
I have a bad habit of obsessing with my hobby of the moment. I've thought of a quad copter, but really like the challenge of learning to fly a real RC copter. Believe me when I say, it's not as easy as it looks. But I've always enjoyed a challenge. |
|
December 22, 2011 by icarus |
I gotta say this has been an excellent thread! Rick, I'm very impressed with the way you've presented your findings and the results. I'm embarking on trying this one myself, mainly for the 2 uarts. i saw your thread and figured this would make it a whole lot easier, so THANK YOU. -Ryan p.s. i'm thinking i will post some of my findings from the years that could help some of the new users and maybe even an old dog or two ;) it'll be a few weeks though... |
|
December 23, 2011 by icarus |
I finally got a chance to try the new chips tonight and I'm proud to say the bootloader was installed very easily and the whole thing went off without a hitch. I applaud you again, great work! -Ryan |
|
December 23, 2011 by Rick_S
|
I'm glad it worked out for you. I kind of figured when I did the write up that I wouldn't be the only person who might want to do this. Rick |
|
January 24, 2012 by kemil |
Hi Rick, Ive tried to follow your instructions but it doesnt seem to be working. I am using the ATmega324A-PU, so where ever you put ATmega324p in your instructions i just put ATmega324 (i also did it with the p and it didnt work) the problem i am getting is that when i type in make -f Makefile.fl i get the following message: make -C launcher make[1]: Entering directory ..... make[1]: Nothing to be done for `all'. make[1]: Leaving directory ........ i.e. the same as kelvin. Ive attached an image of my breadboard set up. This is the first time ive tried to install a new bootloader so i have no idea how to trouble shoot it. i have checked the power supply to the breadboard and that seems to be ok. and i had a bit of difficulty installing the USBasp driver onto vista but i eventually did that as well. now im stuck for ideas. Thanks for your help kemil
|
|
January 24, 2012 by Rick_S
|
Did you delete foodloader.o and foodloader.hex from the folder? Also, when using the USBASP on a new microcontroller, you will need to add the jumper for low speed clock at least until the fuses are set. (I think it's J1 on most USBASP boards) If you are supplying external power make sure the USBASP power jumper is not installed. If you are using the USBASP for power make sure it is installed. Do not use both at once. |
|
January 24, 2012 by kemil |
I have just deleted those two files and tried the make -f Makefile.fl command again and i got this! Dont even know where to star. As for the jummer im not entirely sure what you mean. i have connected the reset cable from the circuit board to pin 9 and have added a 10k resistor. ive checked to see if the circuit has power from the usbasp and it does. Thanks for your previous reply, kemil
|
|
January 24, 2012 by Rick_S
|
The 324A and 324P most likely have different signatures. You would have to change everything that references the 324P with the correct data for the 324A. I'm at lunch at work right now so I can't look things up. If I have time, I'll see if I can find the right info for that mcu. Rick |
|
January 24, 2012 by Rick_S
|
Here is a list of the signatures for the A PA variants other than the one I listed at the top.
Rick |
|
January 24, 2012 by JimFrederickson |
Rick_S Isn't, at least part of the problem, occurring farther up the chain? In the uart.h and the config.h files isn't the 'if statement' that has the specific defines for the particular processor in error? I think that is where the "this cpu is not supported yet!" errors are coming from? Or am I missing something? |
|
January 24, 2012 by Rick_S
|
Yes, that was why I posted... You would have to change everything that references the 324P with the correct data for the 324A. I'm at lunch at work right now so I can't look things up. I was just giving him a place to work with until I get home to provide more. Rick |
|
January 24, 2012 by JimFrederickson |
Rick_S I did read that your previous post, but in your post with the 'signatures' there was no further mention of that. I was just making sure that there was an error that occurred previous to that point so "kemil" wouldn't think that the signatures should fix the issue. |
|
January 24, 2012 by Rick_S
|
Jim, - I apologize for the nip - I can be a bit rude sometimes and that was one of those moments. I didn't go into detail at that time because I was at work and didn't have enough time to really get much farther for him. I'm home now. kemil, I just did a quick check and while most of the settings will be similar, there will be one somewhat major issue. AVRDUDE doesn't support the 324A variant. So any programming that you would want to upload to the chip with avrdude, would have to be forced to ignore the signature. I don't know how advanced you are kemil, but while this can be done, it would not be the "cleanest" of solutions. The easiest, would obviously be to get a 324p. Let me know what you plan and at what level you are at, because this could get a little deep. Essentially what has to be done is you would have to go through the datasheet for the 324A and glean all the info relating to each of the file modifications I did above for the 324p. You would have to make sure to add the -F option with the arduino flags to override the signature check. Another option is to just use your usbasp to program the chip and avoid adding a bootloader altogether. You would just compile your programs to a hex the send them over with the usbasp instead - again though with avrdude you would need the -F. Rick |
|
January 25, 2012 by kemil |
Hi Rick, Thank you very much for taking the time to help me, i really appreciate it. I dont think im skilled enough to take on the task of reconfiguring everything for the 324A. Instead im going to buy the ATMEGA324P-20PU and pray that i can get it to work!. Thanks again kemil |
|
January 25, 2012 by Rick_S
|
I think that will be the easiest solution for you. While you are waiting for your part to come in, you can modify the files to make sure you get past the errors. Rick |
|
January 26, 2012 by Ralphxyz
|
Of course you could also get a programer and load your programs directly eliminating the need for a boot loader!! I like the Atmel Dragon but there are lots of other programmers. Ralph |
|
December 21, 2014 by scootergarrett 
|
I'm trying to get on board with the 324p but don't have a 'programer' to bootlaod it. I'm wondering where if at all the My Nerdkit is an ISP Programmer fits in? I have bootloaded a 328p and programed a ATTINY85 which I'm happy with, now I just need to get a handle on the big boy. So here is what tried so far, I hooked it up like this which seems like the correct thing based on bootlaoding a 328 in the past. Then I follow all Rick's steps in the first post, but when I get to the 'make fuses' command get the error 'programmer is not responding' I think the problem is in this line AVRDUDEFLAGS=-c usbasp -pm324p any help would be appreciated, and if I get it figured out I will make a concise procedure on what worked |
|
January 04, 2015 by scootergarrett
|
So now I can load a programs onto the 324 with the 328p as an ISP, but the program must be running on the internal clock because its going very slow and removing the crystal has no effect. So I'm back trying to figure out the foodloader (where dose this get its name?) which I think is what set internal fuses? But now I'm getting this error after the make fuses command: avrdude: verifying ... avrdude: verification error, first mismatch at byte 0x0000 0x2f != 0xef avrdude: verification error; content mismatch I figure someone who knows what there doing might understand this. Here are the files I'm using, hopefully this method of posting a folder works |
|
January 04, 2015 by scootergarrett
|
OK I got a hold on whats going on. I will try to simplify what I've got and make a concise post |
|
January 05, 2015 by Rick_S
|
If you are using a 324P micro, you can download the folder with all the modified files I used from my website at http://rs-micro.com/files/bootloader324P.zip the compiled bootloader, and modified makefiles that worked for me are in the folder. Rick |
|
January 05, 2015 by scootergarrett
|
Now when I use the same delay.h file (well a copy) with a 324p, the delay_ms() runs at half speed, I have messed around with the clock fuses with no luck. Is there something I'm missing? Clock divide by two fuse, or maybe the delay functions are different (like is a NOP a NOP for all microprocessors)? I can load program through UART with the Nerdkits cable so it seems that the clock is working fine. I'm almost there, thanks everyone. |
|
January 06, 2015 by Rick_S
|
If your clock is set the same, the delays should be the same as I recall. Did you use the files I offered to set your fuses? |
|
January 07, 2015 by scootergarrett
|
Here's another clue. When I run real time interrupt code both the 324 and 328 run at the same speed. Here is the code: I think there is something going on with NOP or 'Parallel Instruction Fetches' vs 'Single Cycle ALU Operation' discuses on page 15 of the 328p data sheet. Anyway other things seem to be working fine, and delay functions aren't the best way to code anyways so I'm happy for now. |
|
February 02, 2015 by scootergarrett
|
The 328 LCD library works perfectly with the 324p by wiring up like this
although I had an AC accident on my bread board and toasted my original NerdKits LCD. |
|
September 26, 2015 by scootergarrett
|
So I have boot loaded this 324p DIP now I'm trying it little brother 324p QFP I bough a break out board so I could connect it to a breadboard to bootload. I connected it as shown:
I run the same 'make program' that works with the DIP chip but now I'm getting the error: I have double checked all my connections I'm Think I'm over looking something very obvious like the chips are not exactly the same as each other. Any thoughts? |
|
September 26, 2015 by scootergarrett
|
Ok so there is I bought the 324PA vs the 324P, the differences seem tiny. I got the 324PA working I think I'm going to stick with that style. |
|
October 02, 2015 by BobaMosfet 
|
scootergarrett- Did you check the signature bytes? Likely different between the two. BM |
|
October 02, 2015 by BobaMosfet
|
scootergarrett- I think Rick.S. posted the signature bytes above. Communication with the chip is affected by only a few things:
Most are very easy to check with a logic probe or oscilloscope, and if you ensure the above items are correct, the chip and programmer must communicate. Depending on how the fuses are set, if the QFP is new, you might be able to put a scope on the clock output in and see if you get a signal-- which will tell you the chip isn't just dead. BM |
Please log in to post a reply.
|
Did you know that the microcontroller's crystal oscillator can be used to keep accurate time? Learn more...
|


Copyright © 2013 by NerdKits, L.L.C.