NEW: Learning electronics? Ask your questions on the new Electronics Questions & Answers site hosted by CircuitLab.
Basic Electronics » My LED Cube so far
|
January 05, 2011 by Keyster 
|
Here is a picture of my LED cube so far. man this thing is a lot of work.
|
|---|---|
|
January 06, 2011 by Rick_S 
|
Nice work, those can make some pretty neat animated effects. I imagine the programming would be similar to a marquee but instead of length, you get depth. What are you going to use to drive it -- shift registers?? Rick |
|
January 06, 2011 by nanaeem |
Ahh the LED cube :) I recently got my LED array kit but work comes before play (unfortunately). I figure I will make the Array first, get some experience with LEDs and then jump into an LED cube. 3x3x3 seems too simply so I will try a similar 5x5x5 layout :) |
|
January 06, 2011 by Ralphxyz 
|
My pipedream is to have a 10x10x10 cube tied to Ricks Wii NunChuck accelerometer Gyro code so that I can see a 3 dimensional (3d) representation of the movement of the NunChuck. Maybe once I learn how to program. Ralph |
|
January 06, 2011 by mongo 
|
Even cooler... Multi-color LED's! |
|
January 06, 2011 by Keyster
|
@rick i am using some LED Drivers. i looked around to see what other people are using and i could not find the parts. i wrote down a few part numbers that others had used (youtube, instructables, etc) and went to Digikey, mouser, newark(sp?), and they were all sold out. i guess these things are popular ;) i just searched around digikey and found a driver that looked like it had the exact same functionality/electrical properties. i hope it works. i am using the Sharp IR2D07. i am going to have to use a LOT of transistors also to get the milliamps up where i need them. the LEDs are some cheap-o-s i got from a "clearance" store. they are replacement LEDs for christmas tree lights. i got them for 1 penny (US) each. The leads are very short so i could not solder them to each other so i had to make a "scaffolding" with other wire i had laying around. Don't tell the nerdkit guys but i used their LED Array Kit wire for parts of it. Worked nice. @nanaeem i know what you mean about work. i have been dying at work all day to get home and work on this thing! ;) the best thing about a 3x3x3 is that your can run it straight off the Atmega chip. when you step up to a 5x5x5 you pretty much have to add parts. I did build the LED Array Kit from the nerdkit guys, i will post some pictures of it later tonight. this "electronics stuff" is pretty cool. i have been programming since before most people knew what computers where but have just got into electronics. LOVE IT! @Ralph 10x10x10 would BE AWESOME! i have no idea how you would put it together. the 5x5x5 was pretty easy just time consuming. the LEDs in the middle were a little tricky, i had to put the solder in from one side and the iron in from the other side and try no to move anything while i was in there. i guess you could build several 5x5x5's and then "put them together" to make a 10x10x10. major problem would be MONEY! ;) hehehe Thanks guys! Bryan |
|
January 06, 2011 by Keyster
|
@mongo You are correct, i have been working with some multicolor stuff with PWM (for effects) BUT the price goes WAY UP with them... especially with a 5x5x5 cube... here is a link to my youtube stuff. only have a couple of things out there right now but building it up. of course, i will put the cube out there as i work on it. |
|
January 06, 2011 by Ralphxyz
|
For those hard to reach inside LEDs sometimes it helps to pre tin the leads outside on the bench before trying to solder them in place. And then use paste flux not just the flux core solder. You might only have to apply the heat using a extra hot iron so you are in and out quickly. Of course that means having a variable temperature soldering iron to add to the cost of your projects. Ralph |
|
January 06, 2011 by Keyster
|
Ralph, it's funny you should say that. i just purchased a variable temp iron from Sparkfun (knockoff of a Hakko 936). i have used a Radio Shack "Special" for years just doing around the house stuff and MAN is the new one much nicer! wow, major difference. Bryan |
|
January 06, 2011 by Keyster
|
nanaeem, here are some links to my LED Array. i will just do links instead of embedding so it will not take up so much room in this thread. |
|
January 06, 2011 by Keyster
|
Guys, i found out why DigiKey had this LED Driver in stock (and none of the others i looked for). it is the wrong pin spacing. i thought i checked everything, the speed, the pin out, the functionality, the voltage, etc. i just did not check the pin spacing. crap. any suggestions on how to mod this thing to fit? even if it is a one time use fix? maybe bend every other pin out and solder wires straight to it. normally i would not do this but i am going to use them for something! ;) |
|
January 06, 2011 by 6ofhalfdozen |
Some nice stuff there guys! I haven't try something like this yet, and its kinda far down my projects list at the moment. Though it definately is something to get the mind spinning about how to build and what all it could do. I wonder if you could write up your design for a 10x10x10 cube, then would you be able to build it up in layers( or widths).. ie. start with a 10t x 10d (x 1w) "frame", solder that in place, solder the next 10t x 10d (x 1w) "frame" that mounts next to it as needed by the diagram, solder it next to the first "frame" and so on? Basically, you would be working with only one "layer thick" at a time rather than dealing with multiple dimensions at once.. Of course, the obvious drawback to this method is that if you don't get your drawing right or solder things to match the drawing you are out a decent bit of time and LEDs. Of course, if it were to work I imagine it would be "easy" to expand it out to 10x10x20 or something. just a thought.. |
|
January 07, 2011 by nanaeem |
Hi Keyster, Thanks for sharing the pics. Yesterday I took the first step towards building my Array. I opened the box and marvelled at all the little bits and pieces I had ordered :) One question: In the last pic (LED back closeup) whats that gooey stuff you used to connect the wires to the chips. For that matter what are these chips (I apologize if this should be obvious but I havent even begun to see what components will be used in the Array). I have another project (a Nikon remote) in the works. I am done prototyping and will soon be looking into enclosing the remote in a casing. My remote uses the LCD and I have been thinking about how to ensure that the connections between the LCD and the MCU dont become lose. I am wondering if I could use this "gooey" material to permanently attach wires to the LCD pins. Any thoughts? -N. P.S. apologies for the hijack :( |
|
January 07, 2011 by Keyster
|
@6ofhalfDozen good thinking. build it horizontally instead of vertically. i think a 10x10x10 would be tough no matter how you did it simply due to the mass size and the delicate nature of what you are working with. @nanaeem no need for apologies, that is what this forum is for. i am sort of new to this also BUT i will answer any questions i can. ;) the gooey stuff is just hot glue. those are not chips, they are just plugs. i made it that way so i could disconnect the wires incase i wanted to mount it inside a box or something, i can easily move the board to a new location or even connect it to another array (maybe different color LEDs for christmas for example). the hot glue is to releave some of the presure from the solder joints when moving it around. i have no idea if it was needed, but it sounded good at the time ;) it would work great holding the wires into the LCD display just make sure you put the wires in first and then put the hot glue on, you would not want to get the glue on the exposed parts of the wires. it may hinder the connection. |
|
January 08, 2011 by Keyster
|
here is a link to my youtube page containing my first test of a LED Driver. it actually worked!! holy cow! now to get one with the correct pin spacing and hook it to the cube for testing... keyster |
|
January 08, 2011 by Rick_S
|
That looks to be a pretty neat driver IC based on it's datasheet. Too bad they made it with that oddball .07" spacing. Good job on the programming though, now it's just a matter of hooking it up to the cube. |
|
January 15, 2011 by Keyster
|
FINALLY... i got my shift registers in (with the correct pin spacing). hooked up all the wires and it works like a champ!! here is the YouTube link... now to get a PCB for it. Keyster |
|
January 15, 2011 by Hexorg 
|
A little off-top, but I always wondered if it was possible to make LCD cubes like that?! some LCD screens' segments are transparent when off, and black when on, so could someone make a cube like that? Except maybe colored? |
|
January 16, 2011 by Rick_S
|
You lost me, I don't quite understand what you are saying. |
|
January 16, 2011 by Hexorg
|
Here's how LCD's are pretty much made: |
|
January 16, 2011 by Hexorg
|
Here's another composition for a color TFT LCD screen: |
|
January 16, 2011 by Rick_S
|
I don't see it working. LCD's use light refraction and polarization to make the eyes see either the black or color. The polarization filters would have to be in place for you to see what is in the glass. If you stacked these they would probably cancel each other out and you would either get nothing or black. That is the trick a lot of 3d movies use (the better ones anyway) the ones with what appear to be grey sunglasses. What those glasses to is vertically polarize one eye and horizontally polarize the other. The cameras that do the film are also polarized one vertically and one horizontally. That way one eye sees one camera while blocking the other and vice versa. I'm afraid the refracting filters (as seen in the tft display, and the polarization filters would probably cancel each other out blocking light. I like the idea though, it would make for a neat display if it could be worked out. |
|
January 16, 2011 by Hexorg
|
Yea, you pretty much described ReadD3D movie theaters. I didn't know that polarization filters HAVE to be there for image to show up... darn |
|
January 16, 2011 by Rick_S
|
I may be wrong, but I'm pretty sure they do. Otherwise manufacturers would cut them out to save a few cents. |
|
January 24, 2011 by Keyster
|
Cube Finally Finished! here is a pic of the final PCB. i did not leave enough space for the resistors so i had to offset them a little. looks messy. power to the top left. reset jumper on left below power. crystal and programming switch below that. serial header just below the heat sink (hard to see). the Red LED is just a warning indicator. i use it for several things when writing the animations. Bad timing, etc. 4 x Shift registers, 5 MOSFETs (600mA each), 25 x 150 ohm resistors. 5 resistors at the bottom are 10k ohm pull up/pull down BUT are not required with these shift registers. I left the JPG in full 5MP size for clarity sake.
|
Please log in to post a reply.
|
Did you know that you can connect digital calipers to a microcontroller? Learn more...
|


Copyright © 2013 by NerdKits, L.L.C.

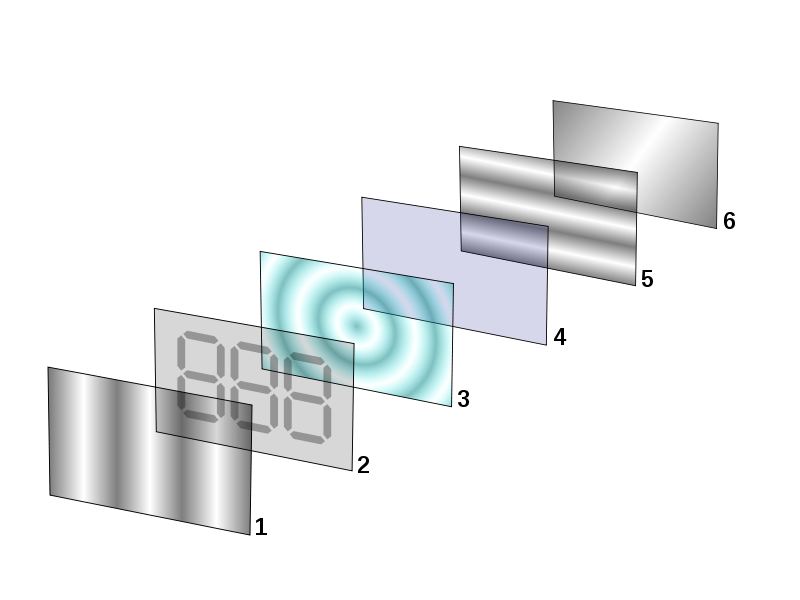 well, this is for monochrome LCDs, But what I was saying is instead of stacking one layer that's marked #2 on that pic, stack, idk, 1024 layers. And instead of having digit shapes, have dot-pixels, and voila - 3D screen with no glasses ^_^
 , what if someone "stacks" layer #4 many times? (well with appropriate layers of connections)
